How to Crochet a Turtle: Easy Free Amigurumi Pattern for Beginners
Crochet Patterns Idea | Free Amigurumi Pattern | Beginner-Friendly Tutorial
Looking for a cute crochet project that combines creativity, cheerful colors, and beginner-friendly techniques? This free crochet turtle pattern is a wonderful way to create your own adorable amigurumi animal using a few basic crochet stitches.
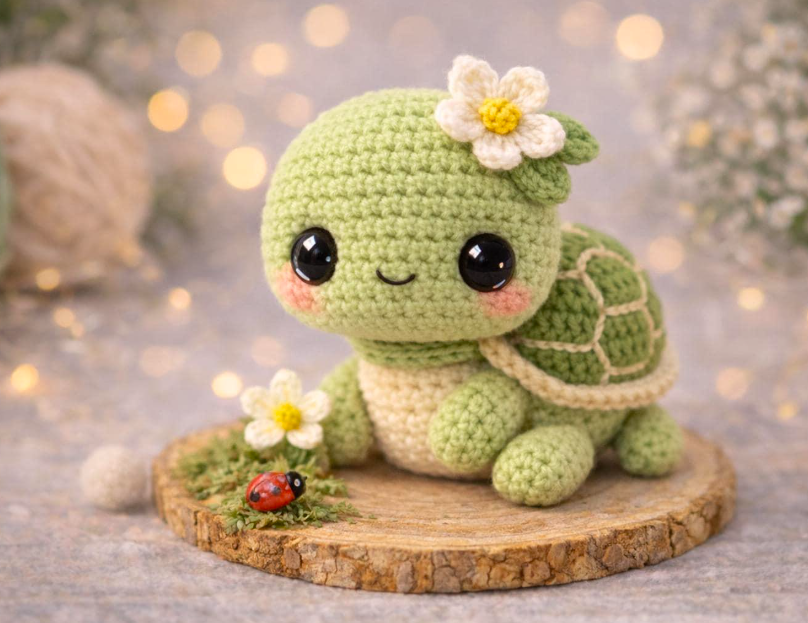
With its round green head, smiling face, little flippers, and beautifully textured shell, this handmade turtle is full of personality. Whether you’re making a thoughtful gift, decorating a shelf, or adding another animal to your crochet collection, this little turtle is sure to bring a smile.
Crochet turtles are particularly enjoyable because they use simple shapes that are easy to recognize. The head is a rounded sphere, the shell is made from two crocheted circles, and the legs are small stuffed tubes. Once the pieces are assembled, you’ll have a charming little turtle that looks lovely in traditional greens or pastel shades.
In this detailed tutorial from Crochet Patterns Idea, you’ll learn how to crochet the turtle’s head, domed shell, underside, four legs, and tail. You’ll also discover how to add decorative shell lines, embroider a friendly face, and sew all the pieces together.
The instructions include exact stitch counts, helpful beginner tips, creative variations, common mistakes, and frequently asked questions.
Crochet Turtle Step-by-Step Illustrated Infographic
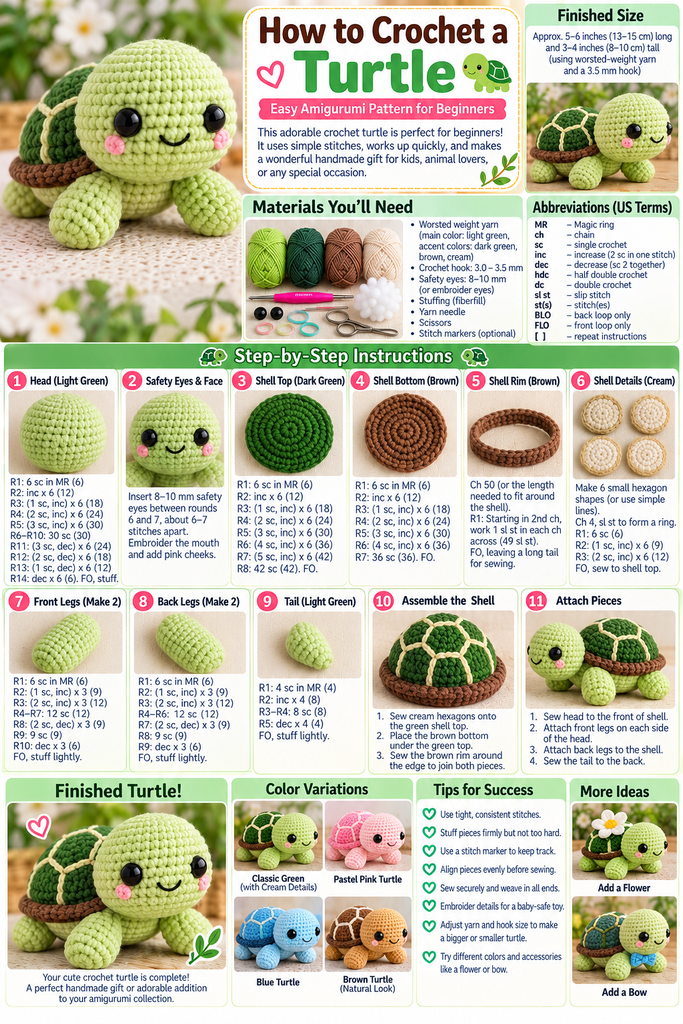
A cheerful crochet turtle with a dark green shell, brown shell rim, cream decorative lines, and light green head and legs. The infographic is a visual guide; use the complete written pattern below for accurate stitch counts and construction details.
Why You’ll Love This Easy Crochet Turtle Pattern
Crocheting a turtle is a great introduction to amigurumi because most of its pieces are made using simple and repetitive stitches.
The rounded head allows you to practice increases and decreases, while the shell introduces basic circular shaping. The legs are straightforward cylindrical pieces, making them useful for practicing consistent stitch tension.
Another reason to love this design is the opportunity for customization.
Traditional shades of green create a realistic-looking turtle, while pink, blue, lavender, or cream can give your project a playful personality.
You can also experiment with different shell decorations. Cream-colored surface crochet lines can create a pattern resembling a turtle’s natural shell, while a plain solid-colored shell provides a simpler appearance.
Crochet turtles also make wonderful gifts for animal lovers and can become part of a handmade collection alongside crocheted ducks, pandas, elephants, and other amigurumi animals.
Crochet Turtle Pattern Overview
Skill level
Confident beginner
Estimated completion time
3–5 hours
Finished length
Approximately 5–6 inches
Finished height
Approximately 3–4 inches
Terminology: US crochet terms
Construction: Separate stuffed head, domed upper shell, flat underside, four legs, and small tail.
Main stitch: Single crochet worked in continuous spirals.
The exact finished dimensions will depend on your yarn, hook size, tension, and stuffing. The size estimates refer to a turtle made using worsted-weight yarn and a 3.5 mm hook.
Materials Needed to Crochet a Turtle

You won’t need many supplies to make your handmade amigurumi turtle.
| Material | Purpose |
|---|---|
| Light green worsted-weight yarn | Head, legs, and tail |
| Dark green worsted-weight yarn | Upper shell |
| Brown yarn | Shell underside and optional rim |
| Cream yarn | Decorative shell lines |
| Black embroidery floss | Eyes and smile |
| Pink embroidery thread | Optional cheeks |
| 3.5 mm crochet hook | Main crochet work |
| Polyester fiberfill | Stuffing |
| Tapestry needle | Sewing pieces together |
| Scissors | Cutting yarn |
| Stitch marker | Keeping track of rounds |
Approximately 100–160 yards of yarn across all colors is a useful starting estimate, although your actual usage will vary.
Choosing the Best Yarn for a Crochet Turtle
Cotton and acrylic yarn are both excellent options for making amigurumi animals.
Cotton yarn provides clear stitch definition, making increases and decreases easier to identify. It also creates a firm structure that helps the turtle maintain its shape.
Acrylic yarn is affordable, lightweight, and available in many different colors.
For a larger and fluffier turtle, you can try chenille or blanket yarn. However, fuzzy yarn may make stitches harder to see, especially when creating the shell.
If you’re a beginner, choose smooth medium-weight yarn.
A hook slightly smaller than the size suggested for loose garments can help create firm stitches that keep the fiberfill hidden.
Crochet Abbreviations You Need to Know
| Abbreviation | Meaning |
|---|---|
| MR | Magic ring |
| ch | Chain |
| sc | Single crochet |
| inc | Increase: 2 sc in one stitch |
| dec | Invisible decrease |
| sl st | Slip stitch |
| st(s) | Stitch(es) |
| BLO | Back loops only |
| FO | Fasten off |
| [ ] × number | Repeat the instructions |
The number shown in parentheses at the end of each round indicates the total number of stitches.
For example, [2 sc, inc] × 6 (24) means to work two single crochets followed by an increase, repeating the sequence six times for a total of 24 stitches.
Unless otherwise noted, crochet in continuous spiral rounds and use a stitch marker to identify the beginning of each round.
Step-by-Step Instructions: How to Crochet a Turtle
This pattern creates a small, sitting-style turtle with a rounded head, four short legs, a two-piece shell, and a tiny tail.
Step 1: Crochet the Turtle’s Head

The turtle’s round head creates its friendly and recognizable appearance.
Begin with light green yarn.
Make a magic ring and crochet six single crochet stitches into the center.
Follow these rounds:
- Round 1: 6 sc in MR (6).
- Round 2: Inc in every stitch (12).
- Round 3: [1 sc, inc] × 6 (18).
- Round 4: [2 sc, inc] × 6 (24).
- Round 5: [3 sc, inc] × 6 (30).
- Rounds 6–10: Sc around (30).
Your work should now resemble a rounded cup.
Next, begin shaping the lower half of the head.
- Round 11: [3 sc, dec] × 6 (24).
- Round 12: [2 sc, dec] × 6 (18).
- Round 13: [1 sc, dec] × 6 (12).
Begin inserting small amounts of fiberfill.
– Round 14: Dec around (6).
Fasten off, leaving a long yarn tail for sewing.
Using a tapestry needle, thread the tail through the front loops of the remaining six stitches and pull gently to close the opening.
Keep enough of the tail available for attaching the head to the shell.
Beginner tip: Distribute stuffing evenly so the head remains rounded without becoming overly firm.
Step 2: Embroider the Turtle’s Eyes and Smile

The facial details give your turtle its cheerful personality.
Use black embroidery floss to create two small oval eyes approximately between rounds 7 and 8 of the head.
Space them about six stitches apart.
For each eye, make several short stitches close together until you achieve the desired shape.
To create a friendly smile, embroider a small curved line approximately two rows beneath the eyes.
For optional pink cheeks, use pink embroidery thread and make two short horizontal stitches beneath the outer corners of the eyes.
Keep all embroidery stitches secure and weave the yarn ends inside the head.
Toy safety: Embroidered eyes are preferable for toys intended for young children. Plastic safety eyes, buttons, and other small detachable pieces may present choking hazards.
Step 3: Crochet the Dark Green Upper Shell

The shell is the turtle’s most distinctive feature.
We’ll create a rounded upper shell using dark green yarn.
Begin with a magic ring.
- Round 1: 6 sc in MR (6).
- Round 2: Inc around (12).
- Round 3: [1 sc, inc] × 6 (18).
- Round 4: [2 sc, inc] × 6 (24).
- Round 5: [3 sc, inc] × 6 (30).
- Round 6: [4 sc, inc] × 6 (36).
- Round 7: [5 sc, inc] × 6 (42).
- Round 8: [6 sc, inc] × 6 (48).
- Round 9: Sc around (48).
- Round 10: Sc around (48).
- Round 11: Sc around (48).
The three even rounds help the shell curve downward, creating a shallow dome rather than a completely flat circle.
Fasten off, leaving a long yarn tail for assembly.
Do not close the opening.
You’ll later join the shell to a separately crocheted underside.
Step 4: Crochet the Brown Shell Underside

The underside supports the dome and helps create a stable stuffed shell.
Using brown yarn:
- Round 1: 6 sc in MR (6).
- Round 2: Inc around (12).
- Round 3: [1 sc, inc] × 6 (18).
- Round 4: [2 sc, inc] × 6 (24).
- Round 5: [3 sc, inc] × 6 (30).
- Round 6: [4 sc, inc] × 6 (36).
- Round 7: [5 sc, inc] × 6 (42).
- Round 8: [6 sc, inc] × 6 (48).
Fasten off, leaving a long sewing tail.
The underside should be approximately the same circumference as the opening of the upper shell.
Lay both pieces together and compare their edges.
If your tension is consistent, both sections should have 48 stitches around their edges, making assembly easier.
Step 5: Add Decorative Shell Patterns

Decorative shell lines can make your crochet turtle look more detailed.
Using ivory or cream yarn, embroider curved lines onto the green shell before joining the upper and lower pieces.
A simple design is to stitch a small hexagon-like shape near the center and connect it to the outer edge with short lines.
You can also create several curved sections instead of precise geometric shapes.
To make each line, thread cream yarn through your needle and use short surface stitches that follow the shape of the shell.
Avoid pulling the thread too tightly because that may distort the shell.
Secure the tails on the underside of the green shell, where they will be hidden after assembly.
For a simpler beginner project, leave the shell plain. It will still look adorable.
Step 6: Crochet Two Front Legs

The front legs are short, rounded pieces that extend slightly forward.
Make two identical legs using light green yarn.
- Round 1: 6 sc in MR (6).
- Round 2: [1 sc, inc] × 3 (9).
- Round 3: [2 sc, inc] × 3 (12).
- Rounds 4–7: Sc around (12).
- Round 8: [2 sc, dec] × 3 (9).
- Round 9: Sc around (9).
Stuff the rounded end lightly.
Flatten the open end.
Work four single crochets through both layers, then close any remaining small gap with your sewing needle.
Fasten off, leaving a long tail for attaching the leg.
Repeat for the second front leg.
Step 7: Crochet Two Back Legs

The back legs are slightly shorter than the front legs, helping the turtle sit comfortably.
Make two pieces using light green yarn.
- Round 1: 6 sc in MR (6).
- Round 2: [1 sc, inc] × 3 (9).
- Round 3: [2 sc, inc] × 3 (12).
- Rounds 4–5: Sc around (12).
- Round 6: [2 sc, dec] × 3 (9).
- Round 7: Sc around (9).
Stuff lightly.
Flatten the opening and close it securely with a yarn needle.
Fasten off, leaving a long sewing tail.
Repeat for the second back leg.
Step 8: Crochet the Turtle’s Tiny Tail

A little tail completes the turtle’s silhouette.
Using light green yarn:
- Round 1: 4 sc in MR (4).
- Round 2: [1 sc, inc] × 2 (6).
- Round 3: [2 sc, inc] × 2 (8).
- Round 4: Sc around (8).
- Round 5: [2 sc, dec] × 2 (6).
Fasten off, leaving a long yarn tail for sewing.
Add a tiny amount of stuffing if needed, then flatten the open end slightly.
The tail should taper toward the tip and remain small compared with the body.
Step 9: Assemble the Turtle’s Shell

Now it’s time to transform the two crocheted shell pieces into a single rounded body.
Place the dark green upper shell over the flat brown underside, aligning their outer edges.
Both pieces contain 48 stitches around their openings.
Join the Shell Pieces
Using brown yarn, insert your crochet hook through one edge stitch of the upper shell and the corresponding edge stitch of the underside.
Work a single crochet through both layers.
Continue working one single crochet through each matching pair of stitches around the shell.
Make sure both pieces remain aligned and avoid accidentally skipping stitches.
Before closing the final section, insert polyester fiberfill between the two layers.
The shell should feel gently rounded but not excessively firm. Too much stuffing may push the underside outward.
Finish joining all 48 stitch pairs and slip stitch into the first joining stitch.
Fasten off and weave the yarn tail securely into the shell.
The brown joining round creates a contrasting rim, similar to the border shown in the illustrated tutorial.
Helpful tip: If you’d like a slightly thicker rim, work one additional round of single crochet around the joined edge.
Step 10: Attach the Turtle’s Head, Legs, and Tail

Before attaching the remaining pieces, place the finished shell on a flat surface.
Decide which edge will become the front of your turtle.
Arrange the head, front legs, back legs, and tail around the body to check their positions.
Attach the Head
Position the light green head against the front edge of the shell.
The embroidered face should point forward, with the head extending slightly beyond the shell.
Use the long yarn tail from the head, or a separate length of matching yarn, to sew through several stitches along the underside of the head and the front edge of the shell.
Make multiple sewing passes to create a firm attachment.
Check that the head remains upright and centered.
Attach the Front Legs
Position one front leg on each side of the head.
Angle the rounded ends slightly forward.
Using the long yarn tails, sew the flattened bases to the lower sides of the shell.
Make sure the legs sit at approximately the same height.
Attach the Back Legs
Place the two shorter back legs near the rear sides of the shell.
Position them slightly outward so the turtle can rest comfortably on a flat surface.
Sew each leg securely into place.
Attach the Tail
Position the pointed tail at the center back of the shell, opposite the head.
Sew its flattened base to the underside of the rear shell edge.
The tail should extend slightly outward.
Once all the pieces are attached, weave any loose yarn tails securely into the body.
Step 11: Add the Final Decorative Details

Your turtle is almost finished!
Gently shape the head, legs, and shell with your hands.
Check that all sewing is secure and the turtle sits comfortably.
If the shell looks uneven, gently redistribute the stuffing between the upper and lower sections.
You can also adjust the position of the legs slightly to improve the finished appearance.
For an extra touch of personality, add a small embroidered heart or flower to the shell.
Avoid loose or detachable embellishments if the turtle will be used as a toy by a young child.
Step 12: Your Crochet Turtle Is Complete!
Congratulations! You’ve completed your adorable amigurumi turtle.
Your finished project should have a rounded light green head, short legs, a small pointed tail, and a beautifully domed shell.
Place your turtle on a shelf, include it in your handmade animal collection, or give it as a thoughtful gift.