How to Crochet a Ladybug: Easy Free Amigurumi Pattern for Beginners
Crochet Patterns Idea | Free Crochet Animal Pattern | Beginner-Friendly Amigurumi Tutorial
Ladybugs are some of the most cheerful little creatures in nature. With their bright red shells, distinctive black spots, tiny legs, and adorable antennae, they make a wonderful inspiration for a handmade crochet project.
If you’ve been searching for an easy crochet ladybug pattern, this free amigurumi tutorial will show you how to make your own adorable little ladybug using basic crochet techniques.
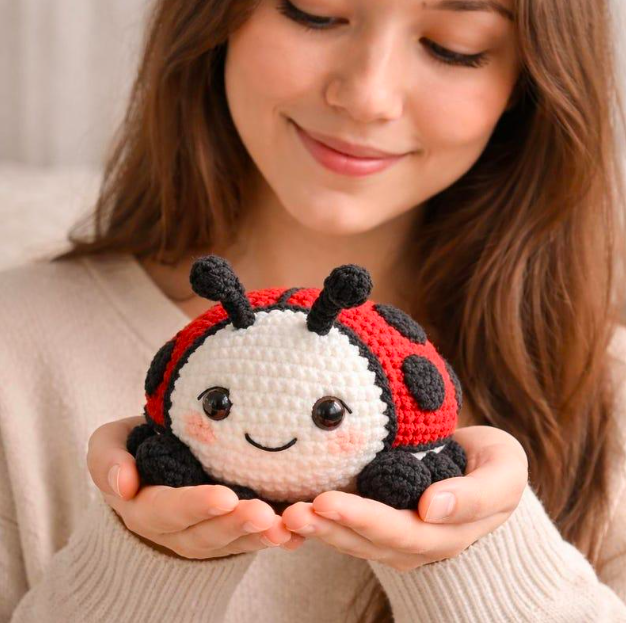
This design features a rounded red shell, flat black underside, soft black head, six tiny legs, two antennae, and decorative black spots. A sweet embroidered smile and rosy pink cheeks give your ladybug its own friendly personality.
Crochet ladybugs are ideal for spring decorations, handmade gifts, garden-themed displays, and amigurumi collections. They’re also relatively small projects, making them an enjoyable way to use leftover yarn.
In this detailed tutorial from Crochet Patterns Idea, you’ll learn how to crochet every part of the ladybug, create evenly spaced shell decorations, assemble the pieces, and add the final facial details.
Whether you’re new to amigurumi or looking for a quick project between larger crochet creations, this guide will help you build your skills one stitch at a time.
Crochet Ladybug Step-by-Step Illustrated Infographic
Professional illustrated crochet ladybug tutorial with red shell, black head, six legs, antennae, spots, materials, construction stages and assembly instructions
A red-and-black crochet ladybug with six legs, raised black spots, antennae, and a cheerful face. The illustration provides design inspiration; the written pattern below contains the complete construction instructions.
Why You’ll Love This Easy Crochet Ladybug Pattern
A crochet ladybug is a lovely project because it combines simple shapes with a colorful and recognizable design.
The body is created from a red crocheted dome attached to a black circular underside. The head is a separate stuffed piece, while the legs, antennae, and spots are small decorative components.
This approach makes the construction easier to understand, especially for crocheters who already know how to make a magic ring and single crochet stitches.
Another benefit is that you can customize the ladybug using different colors. Traditional red and black look beautiful, but pastel pink, yellow, orange, and lavender versions can be equally charming.
Because the project uses relatively small amounts of yarn, it is also a good way to use leftover materials from previous crochet projects.
Making a ladybug gives you opportunities to practice circular increases, basic shaping, sewing, facial embroidery, and assembling small amigurumi pieces.
Crochet Ladybug Pattern Overview
Skill level
Confident beginner
Estimated time
2–4 hours
Finished length
Approximately 3–4 inches
Terminology
US crochet terms
Construction: Domed red shell, black circular underside, separate stuffed head, six legs, two antennae, and six black shell spots.
Main stitch: Single crochet worked in continuous spiral rounds.
The final size will vary depending on your chosen yarn, hook size, stitch tension, and stuffing. This pattern is intended as a small amigurumi decoration.
Materials Needed to Crochet a Ladybug

You only need a few basic crochet supplies to make this adorable ladybug.
| Material | Purpose |
|---|---|
| Red worsted-weight yarn | Rounded ladybug shell |
| Black worsted-weight yarn | Head, underside, legs, antennae, and spots |
| White or cream embroidery floss | Optional eye highlights and smile |
| Pink embroidery floss | Optional cheeks |
| 3.0–3.5 mm crochet hook | Main crochet work |
| Polyester fiberfill | Stuffing |
| Yarn needle | Sewing pieces together |
| Scissors | Cutting yarn |
| Stitch marker | Tracking rounds |
A small amount of each yarn color is usually sufficient. Plan for approximately 40–70 yards of red yarn and 40–60 yards of black yarn, with smaller quantities of embroidery floss.
Choosing the Best Yarn for Crochet Ladybugs
Smooth acrylic or cotton yarn is ideal for a beginner-friendly ladybug.
Cotton produces clearly defined stitches and usually maintains its shape well.
Acrylic yarn is another good option because it is lightweight, affordable, and available in many bright colors.
If you want a soft plush ladybug, chenille yarn can create a fluffier appearance. However, individual stitches may be more difficult to identify.
For this project, smooth worsted-weight yarn and a 3.5 mm hook are a practical starting combination.
Crochet Abbreviations and Stitch Techniques
| Abbreviation | Meaning |
|---|---|
| MR | Magic ring |
| ch | Chain |
| sc | Single crochet |
| inc | Increase: 2 sc in one stitch |
| dec | Invisible single crochet decrease |
| sl st | Slip stitch |
| st(s) | Stitch(es) |
| FO | Fasten off |
| BLO | Back loops only |
| [ ] × number | Repeat instructions |
Numbers in parentheses indicate the total number of stitches at the end of each round.
For example, [3 sc, inc] × 6 (30) means to work three single crochets followed by an increase, repeating six times to finish with 30 stitches.
Unless otherwise noted, work in continuous spiral rounds and mark the first stitch of each round.
Step-by-Step Instructions: How to Crochet a Ladybug
This pattern creates one small, round ladybug with a red domed body and black details.
Step 1: Crochet the Red Ladybug Shell

The red shell is the largest part of your ladybug and establishes its recognizable rounded shape.
Begin with red yarn.
Create a magic ring and crochet six single crochet stitches into the center.
- Round 1: 6 sc in MR (6).
- Round 2: Inc around (12).
- Round 3: [1 sc, inc] × 6 (18).
- Round 4: [2 sc, inc] × 6 (24).
- Round 5: [3 sc, inc] × 6 (30).
- Round 6: [4 sc, inc] × 6 (36).
- Round 7: [5 sc, inc] × 6 (42).
- Round 8: [6 sc, inc] × 6 (48).
- Rounds 9–11: Sc around (48).
The even rounds create a shallow, curved dome rather than a completely flat circle.
Fasten off, leaving a long yarn tail for sewing.
Do not close the shell opening.
You will later attach the shell to a flat black underside.
Step 2: Crochet the Black Underside

The underside provides support and helps seal the stuffing inside the body.
Using black yarn:
- Round 1: 6 sc in MR (6).
- Round 2: Inc around (12).
- Round 3: [1 sc, inc] × 6 (18).
- Round 4: [2 sc, inc] × 6 (24).
- Round 5: [3 sc, inc] × 6 (30).
- Round 6: [4 sc, inc] × 6 (36).
- Round 7: [5 sc, inc] × 6 (42).
- Round 8: [6 sc, inc] × 6 (48).
Fasten off, leaving a long sewing tail.
The outer edge should contain exactly 48 stitches, matching the opening of the red shell.
Place both pieces together to confirm that their edges align comfortably.
Step 3: Crochet the Ladybug’s Black Head

The ladybug’s head is a separate rounded piece.
Using black yarn:
- Round 1: 6 sc in MR (6).
- Round 2: Inc around (12).
- Round 3: [1 sc, inc] × 6 (18).
- Round 4: [2 sc, inc] × 6 (24).
- Rounds 5–7: Sc around (24).
- Round 8: [2 sc, dec] × 6 (18).
- Round 9: [1 sc, dec] × 6 (12).
Add a small amount of fiberfill.
– Round 10: Dec around (6).
Fasten off, leaving a long yarn tail for assembly.
Thread the tail through the front loops of the remaining six stitches and pull gently to close the opening.
Shape the head into a slightly oval form.
Step 4: Crochet Six Black Legs

Ladybugs are insects, so they have six legs.
For this pattern, each leg is a simple narrow crochet tube.
Leg pattern — make six:
- Round 1: 4 sc in MR (4).
- Rounds 2–4: Sc around (4).
Fasten off, leaving a long yarn tail for sewing.
Do not stuff the legs.
They should remain small and flexible.
When all six legs are finished, arrange them in three pairs.
The legs will later be positioned along the left and right sides of the underside.
Step 5: Crochet Two Ladybug Antennae

Two tiny antennae add extra personality to the finished ladybug.
For each antenna:
- Using black yarn, chain six.
- Starting in the second chain from the hook, work one slip stitch into each of the five remaining chains.
- Fasten off, leaving a long tail for sewing.
Repeat to make a second antenna.
For rounded tips, you can make a small secure yarn knot at the end of each antenna.
If the ladybug is intended for a young child, consider embroidering the antennae flat onto the head rather than attaching raised pieces.
Step 6: Crochet Six Black Shell Spots

The black spots are what make your crochet ladybug instantly recognizable.
Using black yarn, create six matching circles.
Spot pattern — make six:
– Round 1: 6 sc in MR (6).
Pull the magic ring closed.
Join with a slip stitch into the first stitch.
Fasten off, leaving a long tail for sewing.
Each spot should form a small, flat circle.
For larger spots, you can add a second round of increases to reach 12 stitches.
However, smaller spots are often easier to arrange evenly on a compact ladybug shell.
Step 7: Sew the Spots Onto the Red Shell

Before joining the upper and lower body pieces, attach the six black spots.
Lay the red shell on your work surface with its rounded side facing upward.
Arrange the spots in two groups of three, leaving a small gap down the middle.
This creates a balanced, traditional ladybug appearance.
Use the long black yarn tails to sew the spots securely around their edges.
Keep the stitching neat and avoid pulling the shell fabric too tightly.
Once all six spots are attached, weave the black yarn tails into the inside of the shell.
Step 8: Add a Decorative Center Line

A black center line can make your ladybug look more like a real insect.
Using black yarn or embroidery floss, stitch a line from the top center of the red shell toward its lower back edge.
Use several short stitches to follow the curve of the shell.
The line should divide the red shell visually into two wing covers.
Keep the stitching flat and secure.
This detail is optional, but it adds a recognizable feature to the design.
Step 9: Join the Red Shell and Black Underside

Place the red upper shell over the flat black underside.
Both pieces should have 48 stitches around their edges.
Using the long red yarn tail or a separate length of black yarn, sew one edge stitch of the red shell to the corresponding edge stitch of the black underside.
Continue matching the stitches around the circumference.
Before closing the final opening, insert small amounts of polyester fiberfill.
Stuff the shell evenly so it maintains a rounded dome.
Avoid overstuffing, which can cause the black underside to bulge outward.
Complete the seam and weave the remaining yarn tail securely inside.
You now have the main ladybug body.
Step 10: Attach the Head

Position the black head at the front of the ladybug body.
The head should extend slightly beyond the edge of the red shell.
Use the long sewing tail from the head to stitch it securely to the front edge of the body.
Make several sewing passes through the head and shell to create a firm attachment.
Check the ladybug from the side to make sure the head remains centered.
Step 11: Attach the Six Legs

The six legs should be arranged in three pairs.
Turn the ladybug upside down.
Position three legs along the left side of the black underside and three along the right side.
Space the legs approximately evenly, with the front pair closest to the head.
Sew each leg securely to the body using its yarn tail.
Once all six legs are attached, place the ladybug on a flat surface and check that it sits comfortably.
Step 12: Add the Antennae and Facial Details

Now give your ladybug an adorable face.
Using white or cream embroidery floss, create two small oval eyes on the front of the black head.
Add a tiny black pupil inside each eye.
For a sweet expression, embroider a small curved smile with white yarn.
Optional pink cheeks can be created with two or three short embroidery stitches beneath the eyes.
Next, position the antennae on the upper part of the head.
Sew them securely in place, making sure they are evenly spaced.
For a child-friendly decorative version, flat embroidered antennae avoid the loose projecting parts of separate crochet antennae.
Your Crochet Ladybug Is Complete!

Congratulations! You’ve made your very own adorable crochet ladybug.
Gently adjust the shape of the shell, head, and legs with your hands.
Check that all the sewn pieces are securely attached.
Your finished ladybug should have a rounded red shell, a black underside, six legs, six spots, two antennae, and a friendly face.
You can display it on a craft shelf, pair it with crocheted flowers, or add it to your handmade amigurumi collection.