How to Crochet an Elephant: Easy Free Amigurumi Pattern for Beginners
Crochet Patterns Idea | Free Crochet Animal Pattern | Beginner-Friendly Tutorial
There’s something irresistibly cute about a handmade crochet elephant. With its oversized floppy ears, long curved trunk, little round feet, and sweet expression, an elephant is one of the most charming animals you can create using yarn and a crochet hook.
If you’ve been wondering how to crochet an elephant, this easy amigurumi tutorial is a wonderful place to begin.
Whether you’re making a handmade gift, decorating a nursery shelf, or adding another animal to your crochet collection, this adorable elephant brings a playful touch to any space.
The good news is that you don’t need to master complicated crochet techniques to make one. This pattern primarily uses single crochet stitches, increases, decreases, and simple sewing.
In this detailed tutorial from Crochet Patterns Idea, you’ll learn how to crochet the elephant’s head, curved trunk, large pink-lined ears, rounded body, arms, legs, and little tail. You’ll also discover how to assemble the pieces, embroider facial details, and personalize your creation.
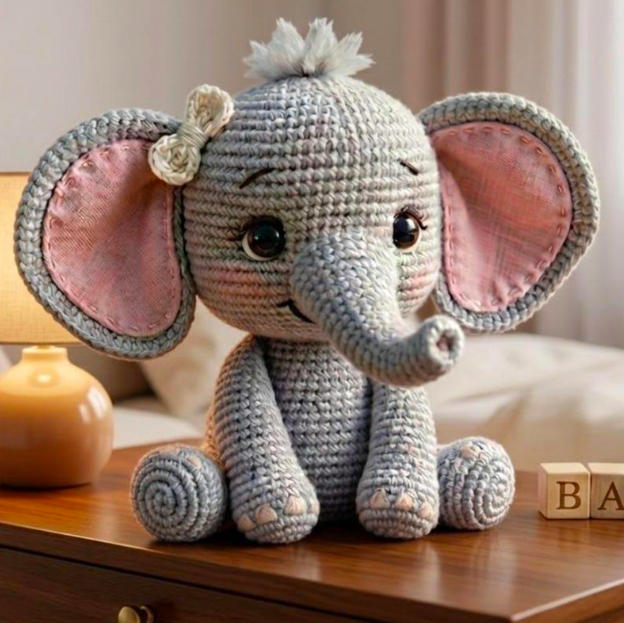
Professional illustrated crochet elephant tutorial showing a finished gray elephant, materials, crochet stitches, construction stages, and assembly instructions
Illustrated crochet elephant design with floppy pink-lined ears, a curved trunk, white belly, and matching paws. Follow the written pattern below for consistent stitch counts; the infographic is a visual reference.
Why You’ll Love This Easy Crochet Elephant Pattern
Crocheting an elephant is a great way to explore amigurumi while practicing fundamental crochet techniques.
The elephant’s body consists mainly of simple rounded shapes. The head is a sphere, the body is slightly pear-shaped, and the arms and legs are small stuffed cylinders.
The long trunk and oversized ears give the finished animal its distinctive appearance.
Another reason this pattern is enjoyable is that you can easily change the colors and create different styles.
A traditional gray elephant looks classic and timeless, while pastel blue, pink, cream, or lavender yarn can create a softer decorative version.
This project is also useful for crocheters who want to improve their shaping and assembly skills. By crocheting separate pieces and sewing them together, you’ll learn techniques that apply to many other amigurumi animal patterns.
Once you’ve completed your first elephant, you can use similar methods to make bears, bunnies, cats, and other adorable creatures.
Crochet Elephant Pattern Overview
Skill Level
Confident Beginner
Estimated Time
4–6 hours
Finished Height
Approximately 7–8 inches
Terminology
US Crochet Terms
Construction: Separate head, trunk, ears, body, arms, legs, tail, and optional belly patch.
Technique: Continuous spiral rounds.
Main stitch: Single crochet.
The finished size depends on your yarn, hook size, crochet tension, and stuffing.
Materials Needed to Crochet an Elephant

Before starting, gather the materials for your handmade elephant.
| Material | Purpose |
|---|---|
| Gray worsted-weight yarn | Head, body, trunk, ears, arms, legs, tail |
| Pink yarn | Inner ears and optional cheeks |
| Ivory white yarn | Belly patch and paw accents |
| Black embroidery floss | Eyes and eyebrows |
| 3.5 mm crochet hook | Main crochet work |
| Polyester fiberfill | Stuffing |
| Yarn needle | Sewing pieces together |
| Scissors | Cutting yarn |
| Stitch marker | Tracking rounds |
Approximately 130–190 yards of main-color yarn is a useful planning estimate, along with smaller amounts of the accent colors.
Choosing the Best Yarn for Your Crochet Elephant
Smooth cotton or acrylic yarn is suitable for most beginner amigurumi projects.
Cotton yarn gives stitches a clear, defined appearance and helps the finished elephant hold its shape.
Acrylic yarn is soft, affordable, and available in many colors, making it another excellent choice.
If you want a fluffy plush elephant, chenille yarn can create a soft texture. However, textured yarn can make individual stitches more difficult to see.
For your first elephant, use medium-weight yarn with a hook small enough to create a dense fabric that keeps the stuffing hidden.
Basic Crochet Abbreviations
| Abbreviation | Meaning |
|---|---|
| MR | Magic ring |
| ch | Chain |
| sc | Single crochet |
| inc | Increase: 2 sc in one stitch |
| dec | Invisible decrease |
| sl st | Slip stitch |
| BLO | Back loop only |
| st(s) | Stitch(es) |
| FO | Fasten off |
| [ ] × number | Repeat instructions |
The numbers in parentheses represent the total stitches at the end of each round.
Unless otherwise stated, work in continuous spiral rounds without joining.
Step-by-Step Instructions: How to Crochet an Elephant
This pattern creates a sitting elephant with a rounded gray head, oversized ears, a gently curved trunk, and cute white-tipped paws.
Step 1: Crochet the Elephant’s Head

Begin with gray yarn.
Make a magic ring and work six single crochet stitches into it.
- Round 1: 6 sc in MR (6).
- Round 2: Inc around (12).
- Round 3: [1 sc, inc] × 6 (18).
- Round 4: [2 sc, inc] × 6 (24).
- Round 5: [3 sc, inc] × 6 (30).
- Round 6: [4 sc, inc] × 6 (36).
- Rounds 7–12: Sc around (36).
Your work should now resemble a rounded cup.
Begin decreasing to shape the lower half.
- Round 13: [4 sc, dec] × 6 (30).
- Round 14: [3 sc, dec] × 6 (24).
- Round 15: [2 sc, dec] × 6 (18).
Begin adding polyester fiberfill.
Continue:
- Round 16: [1 sc, dec] × 6 (12).
- Round 17: Dec around (6).
Fasten off, leaving a yarn tail.
Thread the tail through the front loops of the remaining six stitches and pull gently to close the opening.
Weave the end securely inside the head.
Step 2: Crochet the Elephant’s Trunk

The elephant’s trunk is its most recognizable feature.
To create a gently curved trunk, crochet a narrow tube and shape it while stuffing.
Using gray yarn:
- Round 1: 6 sc in MR (6).
- Round 2: [1 sc, inc] × 3 (9).
- Rounds 3–5: Sc around (9).
- Round 6: [2 sc, inc] × 3 (12).
- Rounds 7–10: Sc around (12).
Fasten off, leaving a long yarn tail.
Add a small amount of stuffing, keeping the trunk flexible.
Gently shape it into a soft upward curve.
If you want the trunk to stay curved, sew a few small stitches along its inner curve using matching gray yarn.
Avoid inserting wire if the elephant is intended as a toy for children.
Step 3: Make Two Large Elephant Ears

Elephants are famous for their oversized ears, and they give this amigurumi design much of its charm.
Make two outer ears and two smaller pink inner-ear pieces.
Outer ear — make two:
Using gray yarn:
- Round 1: 6 sc in MR (6).
- Round 2: Inc around (12).
- Round 3: [1 sc, inc] × 6 (18).
- Round 4: [2 sc, inc] × 6 (24).
- Round 5: [3 sc, inc] × 6 (30).
Fasten off, leaving a long tail.
Flatten the circle gently.
Inner ear — make two:
Using pink yarn:
- Round 1: 6 sc in MR (6).
- Round 2: Inc around (12).
- Round 3: [1 sc, inc] × 6 (18).
- Round 4: Sc around (18).
Fasten off, leaving a sewing tail.
Place each pink circle on top of a gray ear and sew it securely in the center.
This creates a gray border around the pink inner section.
Step 4: Crochet the Elephant’s Body

The elephant’s body has a rounded lower section and a narrower top.
Using gray yarn:
- Round 1: 6 sc in MR (6).
- Round 2: Inc around (12).
- Round 3: [1 sc, inc] × 6 (18).
- Round 4: [2 sc, inc] × 6 (24).
- Round 5: [3 sc, inc] × 6 (30).
- Rounds 6–10: Sc around (30).
- Round 11: [3 sc, dec] × 6 (24).
- Round 12: [2 sc, dec] × 6 (18).
- Round 13: [1 sc, dec] × 6 (12).
- Round 14: Sc around (12).
Stuff the body evenly.
Fasten off, leaving a long yarn tail for attaching the head.
Optional White Belly Patch
Using ivory white yarn:
- Round 1: 6 sc in MR (6).
- Round 2: Inc around (12).
- Round 3: [1 sc, inc] × 6 (18).
- Round 4: [2 sc, inc] × 6 (24).
Fasten off, leaving a sewing tail.
Flatten the patch and sew it onto the front of the body.
Step 5: Crochet the Elephant’s Arms

Make two identical arms.
Using white yarn:
- Round 1: 6 sc in MR (6).
- Round 2: [1 sc, inc] × 3 (9).
- Round 3: Sc around (9).
Change to gray yarn.
- Rounds 4–9: Sc around (9).
- Round 10: [1 sc, dec] × 3 (6).
Stuff the lower sections lightly.
Flatten the upper openings and sew them closed.
Fasten off, leaving a long tail for sewing.
Repeat for the second arm.
Step 6: Crochet the Elephant’s Legs and Feet

The legs are larger than the arms and help your elephant sit upright.
Make two legs.
Using white yarn:
- Round 1: 6 sc in MR (6).
- Round 2: Inc around (12).
- Round 3: [1 sc, inc] × 6 (18).
Change to gray yarn.
- Rounds 4–7: Sc around (18).
- Round 8: [1 sc, dec] × 6 (12).
- Rounds 9–10: Sc around (12).
- Round 11: Dec around (6).
Stuff the legs firmly enough to hold their shape.
Fasten off and close the opening with a yarn needle, leaving a long tail for sewing.
Repeat for the second leg.
Step 7: Crochet the Elephant’s Little Tail

The elephant’s short tail is a simple finishing detail.
Using gray yarn:
- Chain eight.
- Starting in the second chain from your hook, work one slip stitch in each remaining chain.
- Fasten off, leaving a sewing tail.
For an adult decorative elephant, you can add a small yarn tuft at the end.
For young children’s toys, avoid loose tassels or strands that could detach.
Step 8: Assemble the Crochet Elephant

Now it’s time to assemble all the pieces.
Before sewing, lay the head, trunk, ears, body, arms, legs, and tail on your work surface.
This makes it easier to check the proportions.
Attach the Trunk
Position the trunk on the lower center of the elephant’s face.
Use the long gray yarn tail to sew around the open base of the trunk.
Make several small stitches to secure it firmly.
Attach the Ears
Position the ears on either side of the head.
Angle them slightly outward so the large pink inner sections remain visible.
Sew the outer gray edges to the head, leaving most of each ear free to flare outward.
Attach the Head to the Body
Place the head directly above the narrower section of the body.
Sew securely around the neck opening.
Check that the head is centered and sits straight.
Attach the Arms
Position the arms on either side of the upper body.
Make sure the white paws face forward.
Sew the arms securely in place.
Attach the Legs
Place the legs near the bottom front of the body.
Angle them slightly outward so the elephant can sit comfortably.
Sew the legs firmly to the body.
Attach the Tail
Position the small gray tail on the lower back of the body.
Sew it securely and weave in the yarn tail.
Step 9: Add the Eyes and Facial Details

The elephant’s facial details give it personality.
Using black embroidery floss, stitch two small eyes above the trunk.
Try positioning them approximately between rounds 9 and 10 of the head, keeping them symmetrical.
For a sleepy expression, embroider two curved lines instead.
You can add pink cheeks using a few short stitches beneath the eyes.
For an additional playful touch, embroider tiny eyebrows.
If you want small white tusks, they can be represented with short, flat white embroidery stitches rather than separate protruding pieces.
For young children’s toys, embroidered features are preferable to plastic eyes or detachable accessories.
Step 10: Finish Your Handmade Crochet Elephant

Congratulations! Your crochet elephant is complete.
Gently reshape the head, ears, trunk, body, and legs with your hands.
Check that all sewn pieces are firmly attached.
If your elephant doesn’t sit upright, adjust the position of the legs or distribute the stuffing more evenly.
Your finished elephant can become a beautiful handmade gift, shelf decoration, or addition to your amigurumi animal collection.