How to Crochet a Flower: Easy Step-by-Step Pattern for Beginners
Easy Step-by-Step Pattern for Beginners
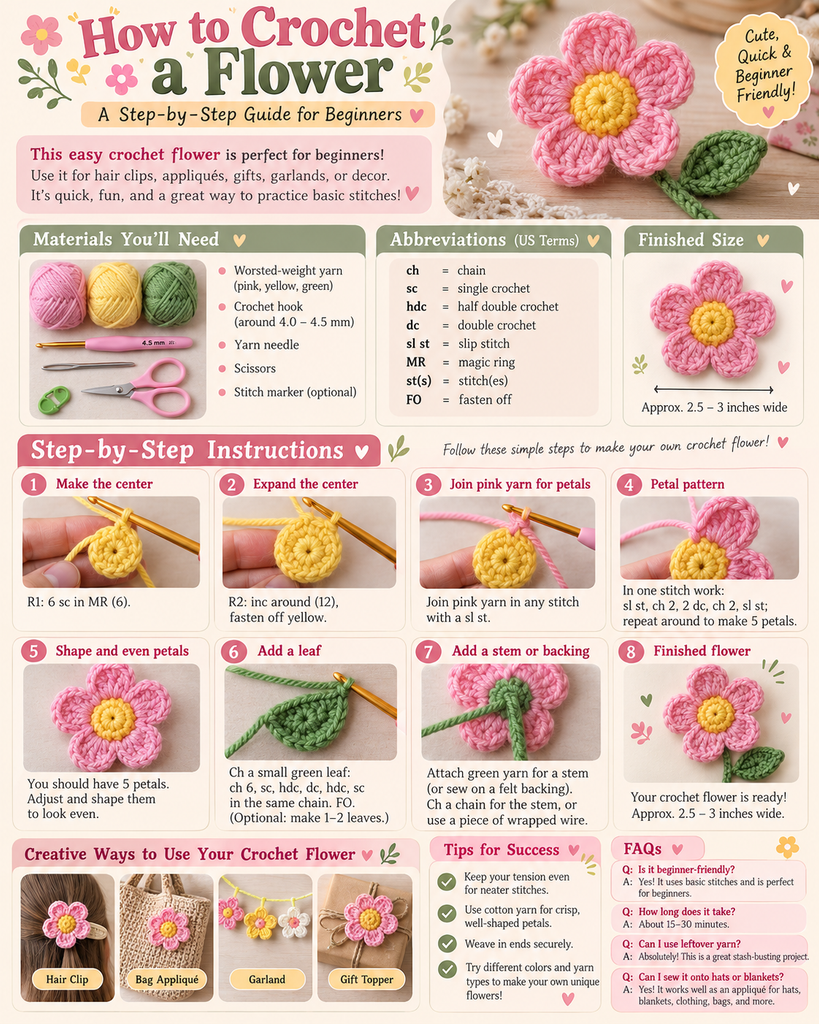
Flowers are one of the prettiest things you can make with a crochet hook and a little yarn. Whether you want to decorate a handmade bag, add something special to a headband, or create a colorful bouquet that never fades, learning how to crochet a flower is a wonderful project for beginners.
Unlike complicated crochet patterns that require hours of concentration, a simple crochet flower can be finished in a short amount of time. You only need basic crochet stitches, a few yarn colors, and some creativity to make something beautiful.
Crochet flowers are also incredibly versatile. You can make them in soft pastel shades, bright summer colors, or elegant neutral tones. Use them as decorations for clothing, blankets, hats, greeting cards, and handmade gifts.
In this free tutorial from Crochet Patterns Idea, you’ll learn how to make a lovely five-petal crochet flower with a yellow center and pink petals. We’ll explain the materials, basic stitches, step-by-step instructions, optional leaves, finishing techniques, and useful tips to help you achieve beautiful results.
Even if you’ve never crocheted a flower before, this guide will help you get started with confidence.

Why You’ll Love This Easy Crochet Flower Pattern
Crocheting flowers is a great introduction to decorative crochet because it allows you to practice a variety of stitches without creating a large or complicated project.
This beginner-friendly flower pattern is especially enjoyable because it uses a small amount of yarn and can be completed using simple crochet techniques.
Another benefit is that you can easily customize your finished flower. Once you understand the basic pattern, you can make flowers in different colors and sizes or combine several flowers into beautiful arrangements.
Small crochet flowers are also excellent stash-busting projects. Instead of throwing away leftover yarn, turn those colorful scraps into decorative handmade flowers.
You can even make matching flowers for different accessories, creating personalized gifts for friends and family.
Crochet Flower Pattern Overview
Skill level
Beginner
Estimated time
20–40 minutes
Flower size
Approx. 2.5–3 inches
Terminology
US crochet terms
Pattern style: Flat five-petal crochet flower with a contrasting center and optional green leaf.
The exact size of your flower will depend on the yarn thickness, crochet hook size, and your individual stitch tension.
Materials Needed to Crochet a Flower

Before beginning your flower, gather the following supplies.
| Material | Purpose |
|---|---|
| Pink worsted-weight yarn | Flower petals |
| Yellow worsted-weight yarn | Flower center |
| Green worsted-weight yarn | Optional leaf and stem |
| 4.0–4.5 mm crochet hook | Making crochet stitches |
| Yarn needle | Sewing pieces and weaving ends |
| Scissors | Cutting yarn |
| Stitch marker | Optional for counting stitches |
| Measuring tape | Optional for checking flower size |
What Type of Yarn Should You Use?
Cotton yarn is one of the best choices for crocheting flowers because it provides clear stitch definition and helps the petals maintain their shape.
Acrylic yarn also works beautifully and is often more affordable. It comes in a wide range of colors, making it perfect for experimenting with different flower designs.
For a delicate crochet flower, choose lightweight yarn and a smaller crochet hook. For a larger decorative flower, use thicker yarn and an appropriately sized hook.
If you’re a beginner, medium-weight yarn is usually easier to handle because the stitches are large enough to see clearly.
Basic Crochet Abbreviations
Before following the pattern, familiarize yourself with these common crochet terms.
| Abbreviation | Meaning |
|---|---|
| MR | Magic ring |
| ch | Chain |
| sc | Single crochet |
| hdc | Half double crochet |
| dc | Double crochet |
| sl st | Slip stitch |
| st(s) | Stitch(es) |
| inc | Two single crochets in one stitch |
| FO | Fasten off |
This tutorial uses US crochet terminology. If you normally follow UK patterns, remember that a US single crochet is called a double crochet in UK terminology, while a US double crochet is called a treble crochet.
Step-by-Step Instructions: How to Crochet a Flower
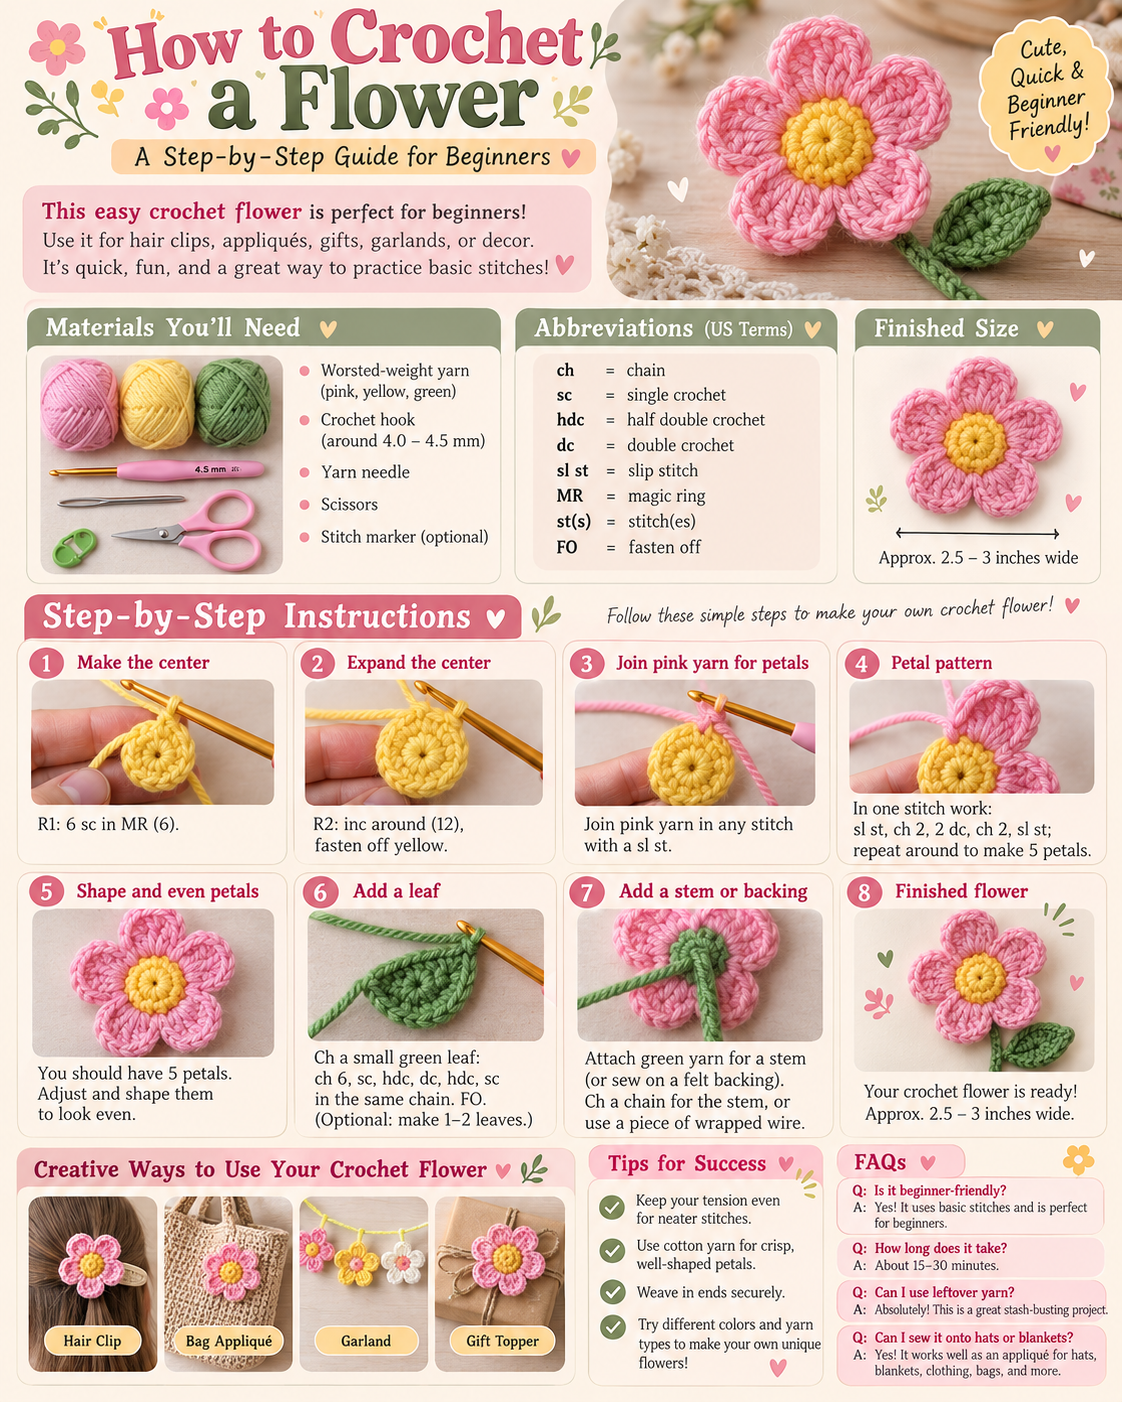
This pattern creates one five-petal flower. You’ll begin with a yellow center, add five pink petals, and optionally finish with a green leaf.
Step 1: Make a Magic Ring
Begin with your yellow yarn.
Create a magic ring by wrapping the yarn around your fingers to form a loop. Insert your crochet hook through the loop, pull up a strand of yarn, and make one chain to secure it.
You now have the starting ring for your flower.
A magic ring is especially useful because you can pull the starting yarn tail to close the center tightly.
If you find the magic ring difficult, you can use an alternative method.
Simply chain two and work the first round into the second chain from your hook.
Both methods produce a small circular center, although the magic ring usually creates a neater finish.
Step 2: Crochet the Yellow Flower Center

Work ten single crochet stitches into the magic ring.
Round 1: 10 sc into MR (10 stitches).
Gently pull the yarn tail to close the ring.
Join the final stitch to the first single crochet with a slip stitch.
Your yellow center should now look like a small, flat circle.
Do not worry if the circle looks slightly uneven. The flower petals will help give the finished project a more balanced appearance.
Count your stitches carefully before moving to the next step. You need exactly ten stitches to create five evenly spaced petals.
Step 3: Change to Pink Yarn

Fasten off the yellow yarn, leaving a tail that can be woven into the back of the flower.
Choose any stitch on the yellow center where you would like to begin the first petal.
Insert your crochet hook into that stitch and attach your pink yarn with a slip stitch.
Make sure the yarn is secure but not overly tight.
Your flower is now ready for its first pink petal.
Step 4: Crochet the First Flower Petal
The petals are formed using chain stitches, double crochet stitches, and slip stitches.
With your pink yarn attached to the first yellow stitch:
- Chain two.
- Work three double crochet stitches into the same yellow stitch.
- Chain two again.
- Slip stitch into that same yellow stitch.
You have completed your first rounded petal.
Now slip stitch into the next yellow stitch. This moves your hook to the starting point of the next petal.
The combination of chains and double crochet stitches creates a softly rounded shape that resembles a real flower petal.
Step 5: Make the Remaining Four Petals

Continue making petals using the same stitch sequence.
For each remaining petal, work into the next unused alternating stitch of the yellow center:
Petal repeat: Slip stitch into the petal’s starting stitch, chain two, work three double crochets into the same stitch, chain two, and slip stitch back into that stitch. Then slip stitch into the following yellow stitch to move toward the next petal.
Because the first petal was already started with an attached slip stitch, work four additional petals in stitches 3, 5, 7, and 9 of the yellow round. The intervening stitches act as spaces between petals.
After completing the fifth petal, slip stitch into the final unused yellow stitch to finish the round.
Fasten off the pink yarn and leave a short tail for weaving.
Your flower should now have five rounded petals surrounding the yellow center.
Step 6: Shape Your Crochet Flower
Place the crocheted flower on a flat surface.
Use your fingers to gently spread the petals into an even arrangement.
If one petal appears smaller, lightly adjust it by pulling the outer stitches into shape.
Avoid stretching the stitches too aggressively because this may distort the flower.
You can lightly block the flower if your yarn is suitable for blocking. This may help the petals remain flat and evenly spaced.
The center should be visible, with the petals surrounding it in a balanced circular arrangement.
Step 7: Crochet an Optional Green Leaf

A green leaf adds an extra touch of detail and makes the flower look more natural.
To make a simple leaf, begin with green yarn.
Leaf pattern:
- Chain eight.
- Make one single crochet into the second chain from your hook.
- Work one half double crochet into the next chain.
- Work one double crochet into each of the next three chains.
- Make one half double crochet into the next chain.
- Work one single crochet into the final chain.
Fasten off, leaving a long yarn tail for sewing.
This produces a small, tapered leaf with a pointed appearance at each end.
If you’d like a fuller leaf, turn your work around the foundation chain and crochet along the opposite side before fastening off.
You can make one leaf or a matching pair, depending on the look you prefer.
Step 8: Attach the Leaf to Your Flower

Position the green leaf behind your crochet flower.
Decide where you want the leaf to appear. Most flowers look attractive with the leaf extending slightly from the lower-right or lower-left side.
Thread the leaf’s yarn tail through a needle and sew the base securely to the back of the flower.
Make several small stitches to hold it in place.
Once attached, weave the remaining yarn tail through the back of the crocheted stitches and trim the excess.
If you want to create a flat flower appliqué for clothing or blankets, you can skip the leaf entirely.
Step 9: Add an Optional Crochet Stem
If you want to use your flower as part of a handmade bouquet, add a simple green stem.
One easy method is to crochet a narrow cord using green yarn.
Make a chain approximately six to eight inches long, then work one slip stitch into each chain.
Fasten off and sew one end securely to the back of your flower.
This creates a flexible stem suitable for hanging decorations or flat floral arrangements.
For upright decorative bouquets, a separate supportive structure may be necessary. Avoid exposed wire ends, especially if the flower will be handled by young children.
Step 10: Finish and Enjoy Your Crochet Flower

Your crochet flower is now complete!
Check the back of your flower to make sure all loose yarn ends have been woven in securely.
Gently adjust the petals and leaf until the flower looks balanced.
You can now use your handmade creation to decorate a bag, embellish a headband, create a garland, or brighten up another crochet project.
Once you’ve completed one flower, try making several in different colors.
A small collection of handmade crochet flowers can become a beautiful decorative display.