Crochet Bee Pattern: Easy Amigurumi Bee
How to Crochet a Cute Bee (Amigurumi Tutorial for Beginners)
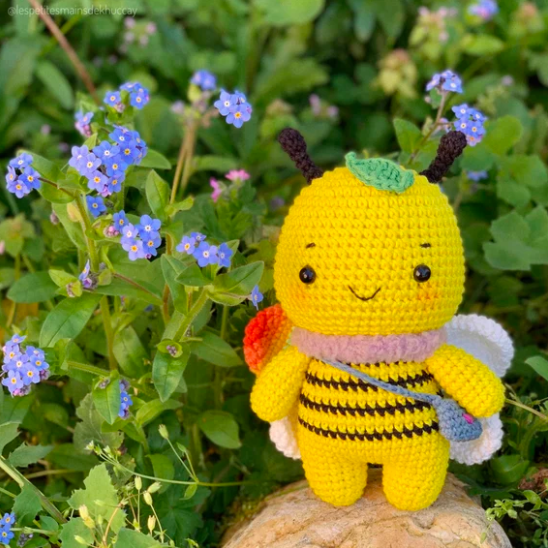
Crochet bee in a natural garden setting. Source: Etsy / Anne the Bee
How to Crochet a Cute Bee (Amigurumi Tutorial for Beginners)
Introduction
A small crochet bee is one of the friendliest first amigurumi projects you can pick. It uses only single crochet, a few increases and some colour changes, and it works up in roughly two hours. The finished bee is about 8 cm tall, round and soft, with tiny wings and a face that makes people smile.
I made my first bee as a gift for a friend who keeps a balcony full of flowers, and it ended up on my own shelf instead. Since then I have made a dozen: keychains, baby-room decorations and little toppers for jars of honey. This tutorial walks you through every round, so even if you have never made a stuffed toy, you can follow along.
By the end you will know how to work in the round, change colours cleanly, stuff a piece evenly and sew parts together. Those four skills carry over to almost every amigurumi pattern you will try later.
[Photo 1: finished yellow and black crochet bee sitting on a green leaf, natural window light]
Alt text: finished yellow and black crochet bee amigurumi on a green leaf
Materials and tools
You do not need much, and most of it is probably already in your craft drawer.
- Yarn: DK or light worsted cotton. About 15 g yellow, 8 g black and 3 g white for the wings. Cotton keeps its shape better than acrylic.
- Hook: 2.5 mm (US C-2). Go a size below what the yarn label suggests so the stuffing does not show through the stitches.
- Safety eyes: 6 mm, or two small black beads, or embroidered eyes if the bee is for a baby.
- Stuffing: about 10 g of polyester fibrefill.
- Extras: tapestry needle, scissors, a stitch marker, and a little pink embroidery thread for cheeks.
[Photo 2: all materials laid out flat on a wooden table: three yarn balls, hook, eyes, stuffing, needle]
Alt text: crochet bee materials including yellow and black cotton yarn, a 2.5 mm hook and safety eyes
Abbreviations (US terms)
| Abbreviation | Meaning |
|---|---|
| MR | magic ring |
| sc | single crochet |
| inc | two single crochet in the same stitch |
| dec | single crochet two stitches together |
| ch | chain |
| sl st | slip stitch |
| FO | fasten off |
| (…) x6 | repeat the instructions in brackets six times |
The number in brackets at the end of a round is your stitch count. Check it after every round. It is the easiest way to catch a mistake early.
Step-by-step crochet bee pattern
The head and body are worked as one round piece, so there is no joining in the middle. Work in a spiral without closing the rounds, and use your stitch marker to mark the first stitch of each round.
Step 1: Crochet the head and body
Start with yellow.
- Round 1: 6 sc in a magic ring (6)
- Round 2: inc in every stitch (12)
- Round 3: (sc, inc) x6 (18)
- Round 4: (2 sc, inc) x6 (24)
- Rounds 5 and 6: sc in every stitch (24)
The head is now done. Push the safety eyes through the stitches between rounds 5 and 6, about five stitches apart, and fasten the backs. Check the position before you close them, because they are hard to move afterwards.
[Photo 3: close-up of the yellow head with the safety eyes just placed, held in one hand]
Alt text: yellow crochet bee head with safety eyes placed between rounds five and six
Step 2: Add the black and yellow stripes
Switch to black on the last stitch of round 6, pulling the new colour through the final loop.
- Rounds 7 and 8: sc in every stitch (24), black
- Rounds 9 and 10: sc in every stitch (24), yellow
- Rounds 11 and 12: sc in every stitch (24), black
You will notice a small step where the colour changes. That is normal. Hide it by making the first stitch of each new round a little tighter, and keep all the colour changes lined up at the back of the bee.
[Photo 4: the striped body in progress, showing the clean colour change at the back]
Alt text: crochet bee body with black and yellow stripes shown during colour change
Step 3: Decrease and stuff the body
Keep working in black.
- Round 13: (2 sc, dec) x6 (18)
- Round 14: (sc, dec) x6 (12)
Stop here and stuff firmly. Use small pinches of fibrefill and push them into the corners first. A well-stuffed bee holds its round shape; an underfilled one looks sad and wrinkly. Then finish:
- Round 15: dec x6 (6)
Cut the yarn, leaving a 15 cm tail. Thread it through the front loops of the last six stitches, pull tight, weave the end inside and cut.
Step 4: Make the wings (make 2)
Use white yarn.
- Round 1: 6 sc in a magic ring (6)
- Round 2: inc in every stitch (12)
- Round 3: (sc, inc) x6 (18)
- Round 4: sc in every stitch (18)
Sl st in the next stitch, then FO and leave a long tail for sewing. Flatten each wing between your fingers. They do not need stuffing, and the flat shape is what makes them look light.
[Photo 5: two white wings next to a coin or ruler for scale]
Alt text: two small white crochet bee wings next to a ruler for size
Step 5: Make the stinger and antennae
For the stinger, use black. Work 5 sc in a magic ring, then sc in every stitch for 2 more rounds (5). FO with a long tail.
For each antenna (make 2), use black. Ch 7, sl st in the second chain from the hook and in each chain after it. FO with a long tail.
Step 6: Sew everything together
Go slowly here. This step is where the bee gets its personality.
- Pin the wings on the back, between the first black stripe and the head, about 1.5 cm apart. Sew them on with a few strong stitches along the base.
- Sew the stinger to the bottom of the body, in the centre.
- Sew the antennae to the top of the head, between rounds 2 and 3, about three stitches apart.
- Embroider a small smile with black thread, two stitches below the eyes, and add pink cheeks with a few straight stitches.
[Photo 6: the finished bee from the front, showing eyes, smile, cheeks and antennae]
Alt text: finished crochet bee amigurumi face with embroidered smile and antennae
Tips and common problems
- Stitches look gappy. Switch to a smaller hook or crochet a little tighter. Gaps are the most common reason stuffing shows through.
- The bee leans to one side. Your stuffing is uneven. Gently squeeze the body to move the filling, or add a tiny bit more on the light side.
- Stripes look crooked. Count your stitches after every round. One missed stitch is usually the cause.
- Wings look floppy. Sew them on along the whole base instead of one point, and pull the thread snug.
A few ways to make it your own: use a fuzzy yarn for a bumblebee look, add a loop of yarn to turn it into a keychain, or make three in different sizes for a nursery mobile. Always keep small parts away from babies and pets unless you embroider the face and sew every piece on very securely.
Frequently asked questions
How long does it take to crochet a bee?
Most beginners finish in about two to three hours. With practice, you can make one in under ninety minutes.
What yarn is best for a crochet bee?
Smooth cotton in DK or light worsted weight gives the cleanest stitches and holds its shape. Acrylic also works if you prefer something softer.
Can I make the bee bigger?
Yes. Use a thicker yarn and a bigger hook. A chunky yarn with a 4 mm hook gives you a bee about 15 cm tall, and the pattern stays the same.
Is this pattern suitable for complete beginners?
If you can make a magic ring, single crochet and increase and decrease, you can make this bee. If the magic ring is new, practise it a few times first. It is the trickiest part.
Final thoughts
A bee is a small project, but it teaches you most of what you need to start making crochet toys. Once you are comfortable with it, try a ladybug, a little bumblebee with a flower, or a whole garden of insects.
If you make this pattern, I would love to see it. Leave a comment below with your colour choices, and share a photo if you can. Happy hooking!