How to Crochet a Fox: Easy Free Amigurumi Pattern for Beginners
Are you looking for a cute and creative crochet project that will bring a little woodland charm into your home? Learning how to crochet a fox is a wonderful way to practice your crochet skills while making an adorable handmade animal.
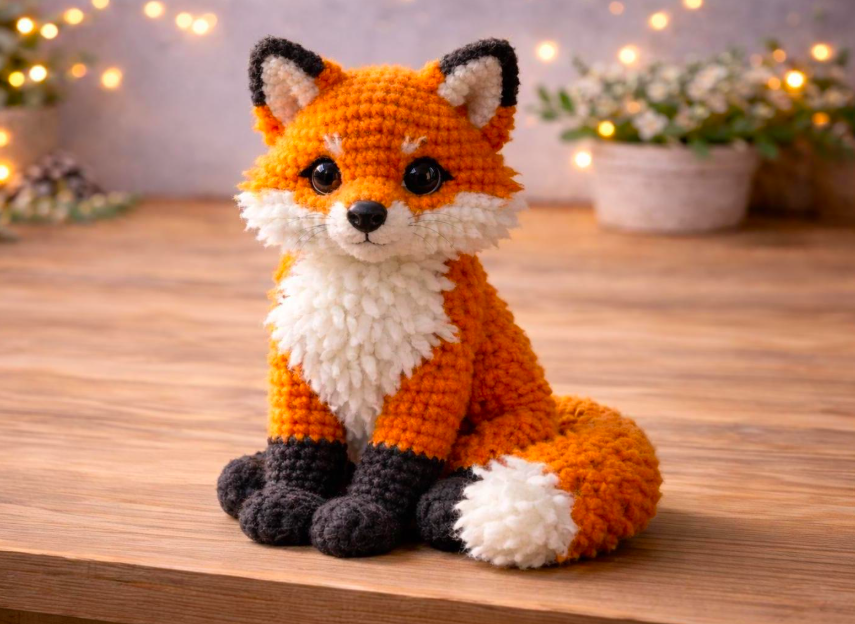
With its bright orange body, pointed ears, sweet white muzzle, tiny brown paws, and fluffy-looking tail, a crochet fox is one of the most charming amigurumi projects you can make. Whether you’re creating a handmade gift, decorating a nursery shelf, or adding another animal to your crochet collection, this little fox is sure to make you smile.
The best part is that you don’t need to be an advanced crocheter to get started. This easy crochet fox pattern uses basic stitches, including single crochet, increases, decreases, and simple sewing techniques.
In this detailed tutorial from Crochet Patterns Idea, you’ll learn how to crochet each part of your fox, including the head, body, ears, muzzle, legs, and tail. You’ll also discover how to assemble the pieces, add adorable facial details, and customize your fox with different yarn colors.
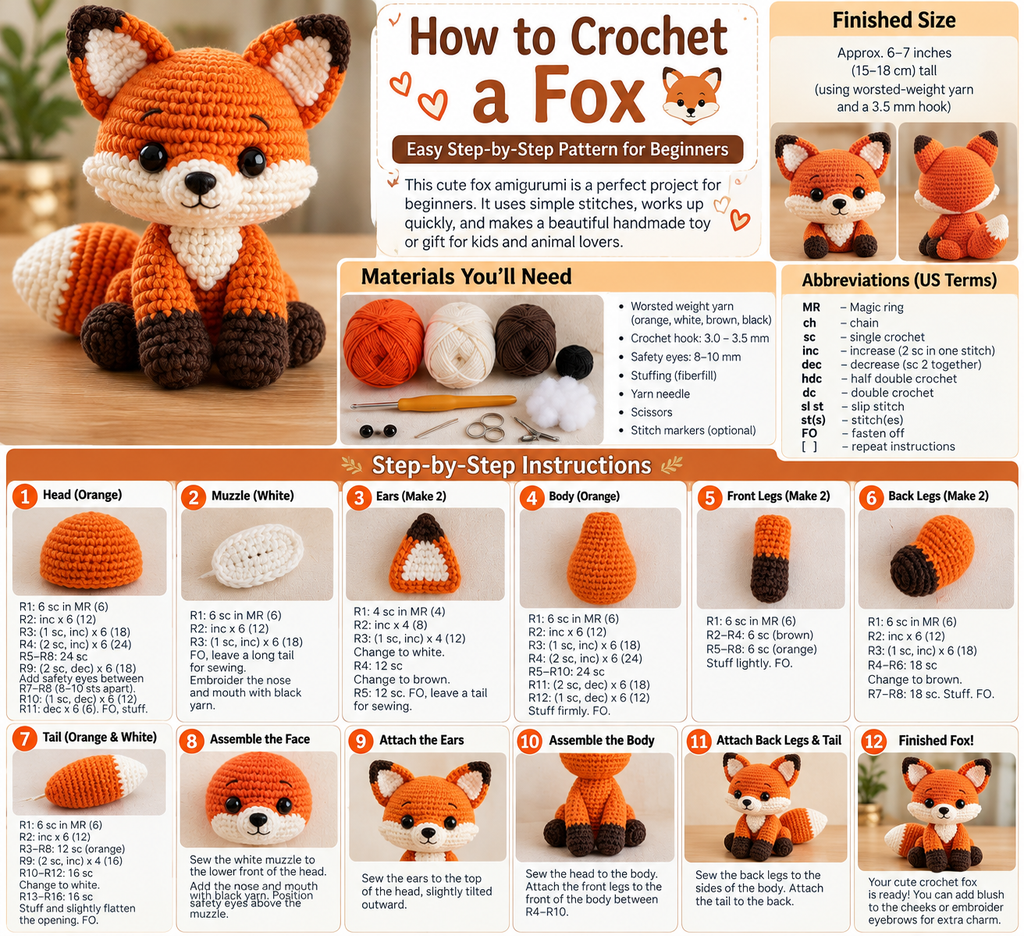
Crochet fox tutorial infographic featuring finished orange amigurumi fox, materials, and construction instructions
Our adorable woodland fox design. Use the detailed pattern below for the stitch counts and assembly sequence; the illustrated guide is a visual reference rather than an exact stitch chart.
Why You’ll Love This Easy Crochet Fox Pattern
Crocheting woodland animals is a wonderful way to explore amigurumi, the Japanese art of creating small crocheted or knitted stuffed characters.
Foxes are especially fun because their distinctive features are easy to recognize. Their pointed ears, orange coloring, white faces, and bushy tails give them a playful personality.
This beginner-friendly crochet fox pattern is ideal for crocheters who already understand a few basic techniques and want to practice shaping.
The project also provides plenty of opportunities for personalization. You can use traditional orange yarn, create a white arctic fox, or experiment with pastel colors for a softer appearance.
Another advantage is that small amigurumi animals don’t require large quantities of yarn. You may already have enough leftover orange, white, and brown yarn to complete this project.
Once finished, your fox can become a lovely shelf decoration, a handmade gift, or part of a collection of crocheted woodland creatures.
Crochet Fox Pattern Overview
Skill level
Confident beginner
Estimated time
4–6 hours
Finished height
Approximately 6–7 inches
Terminology
US crochet terms
Construction: Separate crocheted head, body, muzzle, ears, four legs, and tail, sewn together.
Main colors: Orange, ivory white, and dark brown.
The finished size depends on your yarn weight, hook size, tension, and stuffing. Treat the measurements as estimates.
Materials Needed to Crochet a Fox

Before starting your crochet fox amigurumi, gather the necessary materials.
| Material | Purpose |
|---|---|
| Orange worsted-weight yarn | Head, body, legs, ears, and tail |
| Ivory white yarn | Muzzle, chest patch, ear details, and tail tip |
| Dark brown yarn | Paws and ear tips |
| Black embroidery floss | Eyes, nose, and mouth |
| 3.5 mm crochet hook | Main crochet stitches |
| Polyester fiberfill | Stuffing the fox |
| Yarn needle | Sewing pieces together |
| Scissors | Cutting yarn |
| Stitch marker | Identifying the beginning of rounds |
You can also use 8–10 mm safety eyes for a decorative collectible intended for adults or older users. For a toy intended for a young child, embroidered facial features are the better option because plastic eyes can become choking hazards.
What Yarn Is Best for Amigurumi Foxes?
Cotton and acrylic yarn are both suitable for crocheting a small fox.
Cotton yarn creates clearly defined stitches and usually produces a firm structure. This helps amigurumi animals maintain their shape.
Acrylic yarn is another excellent choice because it’s affordable, widely available, and comes in many beautiful colors.
For a classic woodland fox, choose a warm pumpkin-orange shade. Pair it with creamy white yarn and dark chocolate brown for a natural appearance.
If you’re making your first amigurumi fox, avoid very fluffy yarn. Smooth yarn makes it easier to identify stitches and count rounds correctly.
Basic Crochet Abbreviations
Understanding the following abbreviations will make the pattern easier to follow.
| Abbreviation | Meaning |
|---|---|
| MR | Magic ring |
| ch | Chain |
| sc | Single crochet |
| inc | Increase: 2 sc in one stitch |
| dec | Invisible decrease: sc 2 stitches together |
| sl st | Slip stitch |
| BLO | Back loop only |
| st(s) | Stitch(es) |
| FO | Fasten off |
| [ ] | Repeat the instructions inside the brackets |
The number shown in parentheses at the end of each round indicates the total number of stitches you should have.
For example, [2 sc, inc] × 6 (24) means you work two single crochets, then one increase, and repeat that sequence six times, ending with 24 stitches.
Unless otherwise stated, work this pattern in continuous spiral rounds without joining.
Step-by-Step Instructions: How to Crochet a Fox
This pattern creates one adorable sitting fox with a rounded head, small body, dark paws, pointed ears, and a striped tail.
We will crochet each section separately before assembling the finished animal.
Part 1: Crochet the Fox Head

The fox’s head is one of the most important parts of the project. A smooth, rounded shape creates the foundation for its adorable expression.
Step 1: Start the Magic Ring
Using orange yarn, create a magic ring.
Work six single crochet stitches into the center.
Round 1: 6 sc in MR (6).
Pull the starting yarn tail to close the ring.
Place a stitch marker into the first stitch so you can easily track your rounds.
Step 2: Increase the Head
Continue crocheting in spiral rounds.
- Round 2: Inc in every stitch (12).
- Round 3: [1 sc, inc] × 6 (18).
- Round 4: [2 sc, inc] × 6 (24).
- Round 5: [3 sc, inc] × 6 (30).
- Round 6: [4 sc, inc] × 6 (36).
- Round 7: [5 sc, inc] × 6 (42).
The fabric should gradually expand into a rounded cup.
Try to maintain even tension as you work.
Step 3: Build the Head Shape
Rounds 8–13: Sc in every stitch around (42 stitches per round).
These even rounds create the width and depth of the fox’s head.
At this point, the head should resemble a shallow orange bowl.
Step 4: Add the Eyes
If using embroidered eyes, you can wait until after the head is stuffed and closed.
For plastic safety eyes intended for an adult decorative item, position them approximately between rounds 10 and 11, leaving seven or eight stitches between them.
Check that the eyes appear symmetrical before securing them.
Step 5: Decrease and Stuff the Head
Begin shaping the bottom of the head.
- Round 14: [5 sc, dec] × 6 (36).
- Round 15: [4 sc, dec] × 6 (30).
- Round 16: [3 sc, dec] × 6 (24).
- Round 17: [2 sc, dec] × 6 (18).
Add polyester fiberfill gradually, spreading it evenly inside the head.
Continue decreasing:
- Round 18: [1 sc, dec] × 6 (12).
- Round 19: Dec around (6).
Fasten off, leaving a short yarn tail.
Thread the tail through the front loops of the remaining six stitches and pull gently to close the opening. Weave the tail into the head.
Your fox’s head is now complete.
Part 2: Crochet the White Fox Muzzle

The white muzzle gives your fox its recognizable woodland appearance.
It also provides a beautiful contrast against the orange head.
Step 1: Create the Muzzle
Using white yarn:
- Round 1: Make 6 sc in MR (6).
- Round 2: Inc in every stitch (12).
- Round 3: [1 sc, inc] × 6 (18).
- Round 4: Sc around (18).
Fasten off, leaving a long yarn tail for sewing.
Gently flatten the piece into a slightly oval shape.
Step 2: Embroider the Nose
Thread black embroidery floss through your yarn needle.
Create a small triangular nose near the upper center of the white muzzle.
You can make the nose by working several short stitches close together.
Once the nose is complete, stitch a short vertical line downward, followed by two tiny curved stitches to create a smiling mouth.
Step 3: Attach the Muzzle
Position the muzzle on the lower front portion of the fox’s head.
Use the yarn tail to sew around the edges, attaching the muzzle securely.
Before closing the final section, add a tiny amount of stuffing if you want the muzzle to project slightly.
Avoid overstuffing, which can distort its shape.
Part 3: Crochet Two Pointed Fox Ears

A fox wouldn’t look complete without its distinctive pointed ears.
These ears are crocheted separately and sewn onto the top of the head.
Step 1: Crochet the Outer Ear — Make Two
Using dark brown yarn:
- Round 1: Work 4 sc into a magic ring (4).
- Round 2: [1 sc, inc] × 2 (6).
Change to orange yarn.
- Round 3: [1 sc, inc] × 3 (9).
- Round 4: [2 sc, inc] × 3 (12).
- Round 5: Sc around (12).
- Round 6: [3 sc, inc] × 3 (15).
- Round 7: Sc around (15).
Fasten off, leaving a long tail for sewing.
Flatten each ear gently without stuffing it.
This creates a pointed triangular shape.
Step 2: Create the Inner Ear Detail
For a simple white inner-ear detail, use ivory embroidery yarn to stitch a small triangle onto the front of each orange ear.
Begin near the tip and gradually widen the white stitches toward the base.
Embroidery is an easy way to add contrast without making a separate piece.
Step 3: Attach the Ears
Position the ears near the upper sides of the head, roughly around rounds 5–7.
Angle them slightly outward for a playful expression.
Sew the flattened bases securely to the head.
Check the fox from the front before weaving in the yarn ends.
Part 4: Crochet the Fox Body

The fox’s body should be slightly smaller than its head to create a cute, cartoon-style appearance.
Step 1: Begin the Body
Using orange yarn:
- Round 1: 6 sc in MR (6).
- Round 2: Inc around (12).
- Round 3: [1 sc, inc] × 6 (18).
- Round 4: [2 sc, inc] × 6 (24).
- Round 5: [3 sc, inc] × 6 (30).
Step 2: Work the Body
Rounds 6–10: Sc around (30).
Your work should begin forming a short, rounded cylinder.
Step 3: Shape the Upper Body
- Round 11: [3 sc, dec] × 6 (24).
- Round 12: Sc around (24).
- Round 13: [2 sc, dec] × 6 (18).
- Round 14: Sc around (18).
Stuff the body evenly with fiberfill.
Fasten off, leaving a long yarn tail and keeping the top opening accessible for attaching the head.
Step 4: Add a White Belly Patch
Using white yarn:
- Round 1: 6 sc in MR (6).
- Round 2: Inc around (12).
- Round 3: [1 sc, inc] × 6 (18).
- Round 4: [2 sc, inc] × 6 (24).
Fasten off, leaving a long sewing tail.
Flatten the patch and position it on the front of the orange body.
For a more elongated chest shape, gently stretch the circle into an oval while sewing.
Attach the white patch securely using small, neat stitches.
Part 5: Crochet the Front Legs and Brown Paws

The fox’s front legs are small and slightly elongated.
Make two identical pieces.
Step 1: Begin With Dark Brown Yarn
- Round 1: 6 sc in MR (6).
- Round 2: Inc around (12).
- Round 3: Sc around (12).
These rounds form the dark brown paw.
Step 2: Change to Orange
Change yarn color from brown to orange.
Rounds 4–8: Sc around (12).
The leg will gradually become a small cylinder.
Step 3: Finish the Front Leg
Stuff the lower part lightly.
Flatten the top opening so that the six front stitches align with the six back stitches.
Work six single crochet stitches through both layers to close the opening.
Fasten off, leaving a long tail for sewing.
Repeat the process to make the second front leg.
Part 6: Crochet the Back Legs

The back legs should look slightly rounder than the front legs, helping the finished fox sit upright.
Make two pieces.
Step 1: Crochet the Paw
Using dark brown yarn:
- Round 1: 6 sc in MR (6).
- Round 2: Inc around (12).
- Round 3: [1 sc, inc] × 6 (18).
Step 2: Build the Leg
Change to orange yarn.
Rounds 4–6: Sc around (18).
Stuff the piece lightly.
Step 3: Close the Leg
Round 7: [1 sc, dec] × 6 (12).
Fasten off, leaving a sewing tail.
Repeat to create the second back leg.
These slightly rounded legs will be attached to the lower sides of the body.
Part 7: Crochet the Fox’s Bushy Tail

The tail is one of the most distinctive features of a fox.
For this design, we’ll create a gently tapered tail with a white tip and orange body.
Begin at the tip and gradually increase the width.
Step 1: Crochet the White Tip
Using ivory white yarn:
- Round 1: 6 sc in MR (6).
- Round 2: Sc around (6).
- Round 3: [1 sc, inc] × 3 (9).
- Round 4: Sc around (9).
- Round 5: [2 sc, inc] × 3 (12).
Step 2: Change to Orange
Change to orange yarn.
- Round 6: Sc around (12).
- Round 7: [3 sc, inc] × 3 (15).
- Round 8: Sc around (15).
- Round 9: [4 sc, inc] × 3 (18).
- Rounds 10–13: Sc around (18).
Step 3: Shape the Tail Base
Begin decreasing to make the tail narrower near the body.
- Round 14: [4 sc, dec] × 3 (15).
- Round 15: Sc around (15).
- Round 16: [3 sc, dec] × 3 (12).
- Round 17: Sc around (12).
Stuff the tail gently, keeping the shape slightly curved if desired.
Fasten off, leaving a long tail for sewing.
Your fox now has its signature bushy tail.
Part 8: Assemble Your Crochet Fox

Now comes one of the most exciting steps: putting all the crocheted pieces together.
Before sewing, arrange each piece on your work surface to check its position.
Attach the Head to the Body
Position the head directly above the body.
Use the long yarn tail from the body to sew around the base of the head, securing the two sections together.
Make several passes through the stitches to create a firm connection.
The head should sit straight without wobbling excessively.
Sew on the Front Legs
Position the front legs on either side of the white belly patch.
Angle them slightly forward so the brown paws are visible from the front.
Sew each leg securely to the upper front sides of the body.
Attach the Back Legs
Place the rounded back legs on the lower sides of the body.
Adjust the position until your fox can sit comfortably on a flat surface.
Sew the pieces in place.
Attach the Tail
Position the bushy tail at the lower back of the body.
The tail should extend slightly to one side to help create a balanced appearance.
Use the long orange yarn tail to sew around the attachment area.
Secure it with several small stitches.
Part 9: Add the Final Facial Details

Your fox is almost finished!
A few small facial details can give it a unique personality.
If you haven’t added the eyes yet, use black embroidery floss to create two small oval or round eyes above the white muzzle.
For a sleepy expression, embroider two curved lines instead.
You can also add tiny eyebrows using short black stitches.
If you want rosy cheeks, use a little pink embroidery floss to create small horizontal stitches beneath each eye.
Keep the details simple and symmetrical.
Once you’re happy with the expression, weave all remaining yarn ends securely into the head.
Part 10: Finish and Shape Your Amigurumi Fox

Congratulations! You’ve completed your adorable crochet fox.
Gently shape the head, body, and tail with your hands.
Adjust the ears so they point slightly outward, and make sure the legs are positioned evenly.
Check that all sewn attachments are secure.
If your fox doesn’t sit upright easily, try repositioning the back legs or adjusting the tail.
Your finished fox can now become a charming decoration, a handmade gift, or a companion to other crocheted woodland animals.