Crochet Patterns Idea | Free Amigurumi Pattern | Beginner Tutorial
Crochet Patterns Idea | Free Amigurumi Pattern | Beginner Tutorial
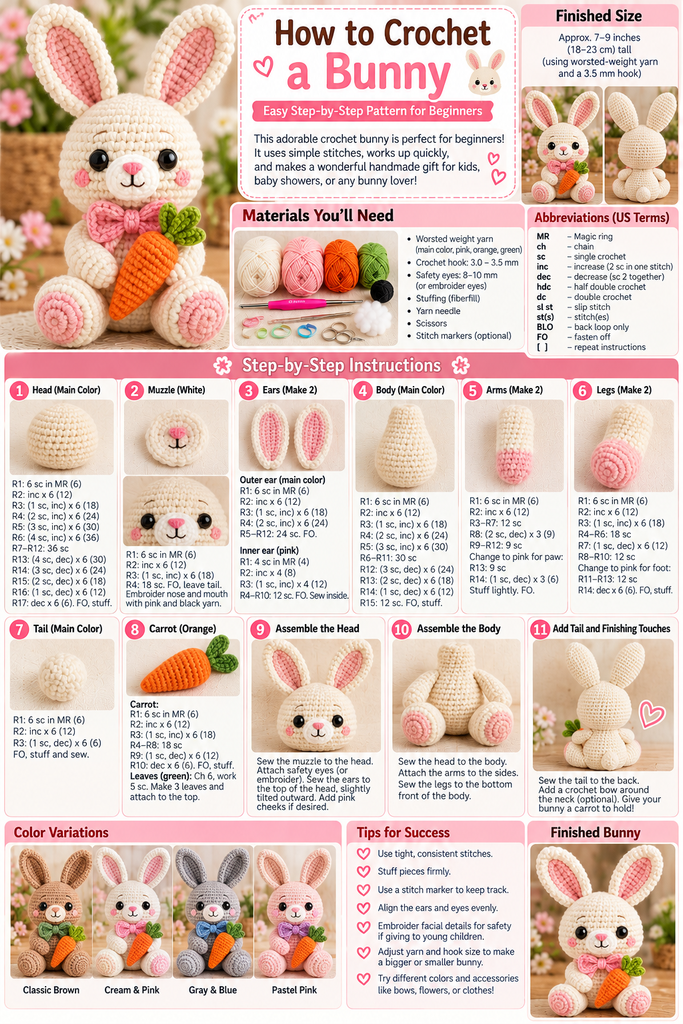
How to Crochet a Bunny: Easy Free Amigurumi Pattern for Beginners
There is something adorable about a handmade crochet bunny. With its long floppy ears, soft rounded body, tiny pink nose, and sweet little paws, a crochet rabbit is one of the most charming amigurumi projects you can make.
Whether you’re preparing a handmade Easter decoration, creating a birthday gift, or adding a cute animal to your crochet collection, learning how to crochet a bunny is a rewarding project for beginners.
You don’t need complicated crochet techniques to get started. With a few basic stitches, soft yarn, and a little patience, you can create a beautiful bunny using simple shapes.
This free crochet bunny pattern from Crochet Patterns Idea will guide you through making the head, body, ears, muzzle, arms, legs, and fluffy tail. You’ll also learn how to embroider facial details, attach the pieces securely, and customize your bunny with different yarn colors.
For a playful finishing touch, we’ll include an optional mini crochet carrot!
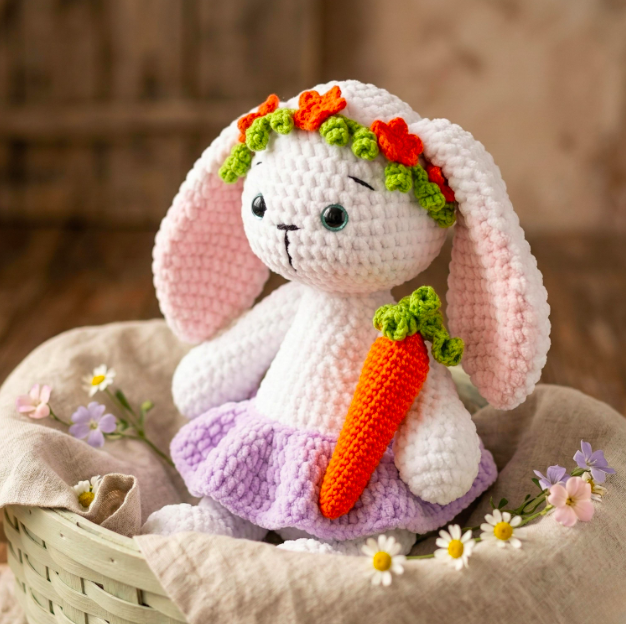
Beginner crochet bunny tutorial with cream rabbit, pink ears, supplies, step-by-step illustrations, and carrot accessory
Our cream-and-pink amigurumi bunny design, featuring long ears, pink paws, and a miniature carrot. The infographic is visual inspiration; follow the detailed written pattern below for consistent stitch counts.
Why You’ll Love This Easy Crochet Bunny Pattern
Crochet bunnies are popular amigurumi projects because their shapes are simple and easy to recognize.
The bunny’s head begins as a rounded sphere, the body is shaped like a small pear, and the arms and legs are made using basic crochet cylinders.
The ears are slightly longer, but they use the same familiar stitches.
This makes the project useful for practicing several essential amigurumi techniques, including working in continuous rounds, increasing, decreasing, stuffing, and sewing separate pieces together.
Another reason to love this design is its versatility. You can crochet a traditional white rabbit, a warm brown woodland bunny, a soft gray bunny, or a pastel pink version.
You can also personalize the face, adjust the ear length, or add a tiny crocheted accessory.
A finished bunny makes a lovely shelf decoration, a handmade gift, or part of a seasonal Easter display.
Crochet Bunny Pattern Overview
Skill level
Confident beginner
Estimated time
4–6 hours
Finished height
Approximately 7–9 inches, including ears
Terminology
US crochet terms
Construction: Separate head, body, muzzle, two ears, two arms, two legs, and a tail, sewn together.
Main technique: Single crochet worked in continuous spiral rounds.
The size will vary based on your yarn, hook, tension, and stuffing. The measurements are estimates rather than guaranteed finished dimensions.
Materials Needed to Crochet a Bunny

Before starting your crochet bunny, gather all the supplies.
| Material | Purpose |
|---|---|
| Cream or ivory worsted-weight yarn | Head, body, ears, arms, legs, and tail |
| Pink yarn | Inner ears, paws, nose, and cheeks |
| Black or dark brown embroidery thread | Eyes and smiling mouth |
| Orange yarn | Optional carrot |
| Green yarn | Optional carrot leaves |
| 3.5 mm crochet hook | Main crochet work |
| Polyester fiberfill | Stuffing |
| Yarn needle | Sewing pieces |
| Scissors | Cutting yarn |
| Stitch marker | Tracking rounds |
Approximately 120–180 yards of main-color yarn is a useful planning estimate, with smaller quantities of the accent colors.
What Yarn Is Best for a Crochet Bunny?
Smooth cotton or acrylic yarn is ideal for most beginners.
Cotton yarn produces clearly defined stitches and helps amigurumi animals maintain their shape.
Acrylic yarn is soft, affordable, and available in many attractive shades.
If you’re making your first crochet bunny, avoid highly textured or fuzzy yarn because individual stitches may become difficult to identify.
For this pattern, worsted-weight yarn and a 3.5 mm hook are a practical starting combination.
The slightly smaller hook helps keep the fabric dense enough to hold the stuffing.
Crochet Abbreviations and Basic Techniques
| Abbreviation | Meaning |
|---|---|
| MR | Magic ring |
| ch | Chain |
| sc | Single crochet |
| inc | Increase: 2 sc in one stitch |
| dec | Invisible single crochet decrease |
| sl st | Slip stitch |
| st(s) | Stitch(es) |
| FO | Fasten off |
| [ ] × number | Repeat instructions |
Numbers in parentheses show the final stitch count for the round.
For example, [2 sc, inc] × 6 (24) means to work two single crochet stitches, then an increase, repeated six times, ending with 24 stitches.
The bunny is worked in continuous spiral rounds unless an instruction says otherwise. Use a stitch marker to identify the first stitch of each round.
Step-by-Step Crochet Bunny Pattern
The following instructions create a sitting bunny with long ears and rounded paws.
Step 1: Crochet the Bunny’s Head

The head is the largest part of your bunny and helps establish its cute proportions.
Using cream yarn, make a magic ring.
- Round 1: 6 sc in MR (6).
- Round 2: Inc in every stitch (12).
- Round 3: [1 sc, inc] × 6 (18).
- Round 4: [2 sc, inc] × 6 (24).
- Round 5: [3 sc, inc] × 6 (30).
- Round 6: [4 sc, inc] × 6 (36).
- Rounds 7–12: Sc in every stitch (36).
Your crocheted piece should now resemble a rounded cup.
Next, begin shaping the lower half of the head.
- Round 13: [4 sc, dec] × 6 (30).
- Round 14: [3 sc, dec] × 6 (24).
- Round 15: [2 sc, dec] × 6 (18).
Add polyester stuffing gradually. Push small pieces into the sides to create a smooth, round shape.
Continue decreasing:
- Round 16: [1 sc, dec] × 6 (12).
- Round 17: Dec around (6).
Fasten off, leaving a yarn tail. Thread the tail through the front loops of the six remaining stitches and pull gently to close the opening.
Weave the yarn end securely inside the head.
Step 2: Crochet the Bunny’s Muzzle

The bunny’s tiny nose and muzzle give it a gentle, friendly expression.
Using cream yarn:
- Round 1: 6 sc in MR (6).
- Round 2: Inc around (12).
- Round 3: [1 sc, inc] × 6 (18).
Fasten off, leaving a long tail for sewing.
Flatten the circle slightly into an oval shape.
Using pink embroidery thread, stitch a small triangular nose near the center.
Then use black or dark brown thread to create a short vertical line beneath the nose and two small curved lines for the mouth.
Position the muzzle on the lower front of the bunny’s head.
Sew the edges securely, keeping the center gently raised if desired.
Step 3: Crochet Two Long Bunny Ears

Long ears are one of the most recognizable features of a rabbit.
Make two identical ears using cream yarn.
- Round 1: 6 sc in MR (6).
- Round 2: Inc around (12).
- Round 3: [1 sc, inc] × 6 (18).
- Rounds 4–12: Sc around (18).
- Round 13: [4 sc, dec] × 3 (15).
- Rounds 14–15: Sc around (15).
Fasten off, leaving a long sewing tail.
Do not stuff the ears. Instead, flatten them gently to create a soft, elongated shape.
Add Pink Inner-Ear Details
Using pink embroidery yarn, sew a long oval-shaped area down the center of each flattened ear.
Begin approximately one inch below the tip and continue toward the base.
Make several parallel embroidery stitches to create a soft pink inner-ear panel.
For a more decorative appearance, use lighter pink yarn and keep the stitches close together.
When both ears are complete, set them aside for assembly.
Step 4: Crochet the Bunny’s Body

The bunny’s body is slightly smaller than the head, with a wider base and narrower upper section.
Using cream yarn:
- Round 1: 6 sc in MR (6).
- Round 2: Inc around (12).
- Round 3: [1 sc, inc] × 6 (18).
- Round 4: [2 sc, inc] × 6 (24).
- Round 5: [3 sc, inc] × 6 (30).
- Rounds 6–11: Sc around (30).
- Round 12: [3 sc, dec] × 6 (24).
- Round 13: [2 sc, dec] × 6 (18).
- Round 14: [1 sc, dec] × 6 (12).
- Round 15: Sc around (12).
Stuff the body evenly before fastening off.
Leave a long yarn tail and keep the final opening intact for attaching the head.
Step 5: Make the Bunny’s Arms

Your bunny needs two small arms to complete its sweet sitting pose.
Make two identical pieces.
Using pink yarn:
- Round 1: 6 sc in MR (6).
- Round 2: [1 sc, inc] × 3 (9).
- Round 3: Sc around (9).
Change to cream yarn.
- Rounds 4–10: Sc around (9).
- Round 11: [1 sc, dec] × 3 (6).
Stuff the lower section lightly.
Flatten the top opening and sew it closed with three small stitches through both layers.
Fasten off, leaving a long tail for attaching the arm to the body.
Repeat for the second arm.
Step 6: Crochet the Bunny’s Legs and Pink Feet

The bunny’s large back feet are another adorable feature.
Make two matching legs.
Start with pink yarn:
- Round 1: 6 sc in MR (6).
- Round 2: Inc around (12).
- Round 3: [1 sc, inc] × 6 (18).
Change to cream yarn.
- Rounds 4–7: Sc around (18).
- Round 8: [1 sc, dec] × 6 (12).
- Rounds 9–10: Sc around (12).
- Round 11: Dec around (6).
Stuff each leg before closing it.
Fasten off, leaving a yarn tail for sewing.
Repeat for the other leg.
These rounded legs will help the finished bunny sit comfortably.
Step 7: Crochet the Bunny’s Fluffy Tail

A little rounded tail completes the classic bunny appearance.
Using cream yarn:
- Round 1: 6 sc in MR (6).
- Round 2: Inc around (12).
- Round 3: [1 sc, inc] × 6 (18).
- Round 4: Sc around (18).
- Round 5: [1 sc, dec] × 6 (12).
- Round 6: Dec around (6).
Add a small amount of stuffing.
Fasten off, leaving a sewing tail.
The result is a soft, rounded tail that can be attached to the lower back of the body.
Step 8: Crochet a Mini Carrot for Your Bunny

A tiny crocheted carrot is a fun optional accessory that makes your bunny even more charming.
Using orange yarn, begin at the pointed end of the carrot.
Carrot pattern:
- Round 1: 4 sc in MR (4).
- Round 2: Sc around (4).
- Round 3: [1 sc, inc] × 2 (6).
- Round 4: Sc around (6).
- Round 5: [2 sc, inc] × 2 (8).
- Round 6: Sc around (8).
- Round 7: [3 sc, inc] × 2 (10).
- Round 8: Sc around (10).
- Round 9: [4 sc, inc] × 2 (12).
- Round 10: Sc around (12).
- Round 11: [1 sc, dec] × 4 (8).
- Round 12: Dec around (4).
Stuff the carrot lightly before the final decrease. Fasten off and close the remaining opening with a yarn needle.
Add Green Carrot Leaves
Using green yarn, attach your yarn near the wider end of the carrot.
Chain six, then slip stitch back down the chain, starting in the second chain from your hook.
Repeat two more times to create three small leafy strands.
Fasten off and weave the tails securely inside the carrot.
The carrot can be displayed alongside your finished bunny or sewn between its paws for an adult decorative piece.
For toys intended for young children, avoid small detachable accessories.
Step 9: Assemble Your Crochet Bunny

Now comes one of the most exciting parts of making your bunny: turning the individual pieces into a complete amigurumi animal.
Before sewing, arrange the head, body, ears, arms, legs, and tail on your work surface.
This allows you to check the overall proportions and adjust the placement of each piece.
Attach the Head
Place the crocheted head above the narrow opening of the body.
Use the long yarn tail from the body to sew the two pieces together.
Work small, secure stitches around the opening, catching stitches on the lower section of the head.
Check that the head sits straight before weaving in the remaining yarn tail.
Sew on the Bunny Ears
Position the two long ears near the top of the head, approximately around rounds 4–6.
Angle them slightly outward for a cute, playful appearance.
Flatten the bottom of each ear and sew it firmly to the head.
If you want floppy ears, position them slightly farther apart. For more upright ears, bring them closer together and sew a wider section of the base.
Attach the Arms
Place the arms on either side of the upper body, just below the head.
Make sure the pink paw sections face forward.
Sew each arm securely in place.
Attach the Legs
Position the legs at the lower front of the bunny’s body.
Angle the feet slightly outward so the bunny can sit comfortably.
Before sewing permanently, place the bunny on a flat surface to check its balance.
Add the Tail
Position the small round tail on the lower back of the body.
Sew it securely using the remaining yarn tail.
The tail adds a classic bunny silhouette and a cute finishing detail.
Step 10: Embroider the Eyes and Final Facial Details

The facial expression gives your bunny its unique personality.
Using black embroidery floss, create two small eyes approximately between rounds 9 and 10 of the head.
Keep them evenly spaced and positioned above the muzzle.
For a sweet expression, make small round eyes. If you prefer a sleepy bunny, embroider gently curved lines instead.
You can also add pink cheeks using two or three small horizontal stitches beneath each eye.
Check the face from the front to ensure the features are balanced.
Secure all embroidery tails inside the head.
Safety tip: Embroidered eyes and facial features are preferable for toys intended for young children. Plastic safety eyes, even when described as secure, may detach and become choking hazards.
Step 11: Finish Your Handmade Crochet Bunny

Congratulations! Your adorable crochet bunny is complete.
Gently shape the head, ears, arms, legs, and body with your hands.
Adjust the stuffing if necessary and make sure all sewn pieces are firmly attached.
Your finished bunny should have a rounded head, long ears, a small stuffed body, cute paws, and a fluffy tail.
You can leave it as a simple handmade rabbit or display it alongside the miniature crochet carrot.
This design makes a lovely addition to an Easter centerpiece, woodland-themed shelf, or handmade amigurumi collection.
Creative Ways to Customize Your Crochet Bunny
Once you’ve finished your first bunny, experiment with different colors and styles to create a whole collection of handmade rabbits.

Classic Brown Bunny
Use warm brown yarn with cream accents for a natural woodland look.

White and Pink Bunny
Create a soft, sweet design using ivory yarn and pastel pink details.

Gray Woodland Rabbit
Gray yarn creates a gentle, realistic-looking rabbit.

Pastel Pink Bunny
Choose blush pink yarn for a playful, decorative variation.
Helpful Tips for Making a Beautiful Crochet Bunny
Keep Your Stitches Tight and Even
Amigurumi looks best when the stitches are firm enough to keep the stuffing hidden.
If you notice large gaps between stitches, consider using a slightly smaller crochet hook.
Avoid pulling your yarn so tightly that crocheting becomes uncomfortable.
Use a Stitch Marker
A stitch marker helps you identify the beginning of each round.
Since this bunny is worked in continuous spirals, moving your marker after every round prevents confusion and makes stitch counting easier.
Stuff Gradually
Instead of pushing large amounts of stuffing into a piece at once, add small pieces gradually.
This creates a smoother shape and prevents unwanted lumps.
The head and body should be firm, while the ears generally don’t need any stuffing.
Make Both Ears the Same Size
Count each round carefully when making the ears.
Check that the two pieces have the same number of stitches and rounds before attaching them.
A slight difference in tension may produce uneven ears, even with matching stitch counts.
Check the Assembly Before Sewing
Position every piece before attaching it permanently.
Examine the bunny from the front, side, and back to make sure the head, arms, legs, and ears look balanced.
Common Crochet Bunny Mistakes and How to Fix Them
Why Is My Bunny’s Head Uneven?
Uneven shaping usually occurs when stitches are accidentally added or missed.
Count the stitches at the end of each shaping round.
If the difference is small, gently adjust the stuffing to improve the shape.
Why Are My Bunny’s Ears Curling?
Crochet ears can curl because of stitch tension or the way the fabric naturally forms.
Gently flatten the ears before sewing.
You can also lightly block the ears if your yarn is suitable for blocking.
Why Is Stuffing Showing Through the Crochet?
Visible stuffing usually indicates loose stitches or too much fiberfill.
Try using a smaller hook or removing a little stuffing.
Why Won’t My Bunny Sit Upright?
The position of the legs affects your bunny’s balance.
Adjust the legs so they extend slightly forward and provide a wider sitting base.
How Do I Make My Crochet Bunny Bigger?
Using thicker yarn and a larger crochet hook will increase the finished size while keeping the same stitch counts.
Remember that a larger bunny will also require more stuffing and yarn.
How to Wash and Care for Your Crochet Bunny
Proper care helps your handmade bunny stay clean and maintain its shape.
Always check the washing instructions for the yarn you’ve used.
For delicate amigurumi toys, gentle handwashing may be appropriate.
Use cool water and mild detergent. Avoid twisting or squeezing the bunny too aggressively.
After washing, gently press out excess water using a clean towel.
Reshape the ears, head, body, and legs before allowing the bunny to air-dry thoroughly.
Do not store stuffed crochet toys while damp because moisture can remain trapped inside the fiberfill.
Inspect the seams and embroidery regularly, particularly if the bunny is handled frequently.
Frequently Asked Questions About Crochet Bunny Patterns
Is this crochet bunny pattern suitable for beginners?
Yes. This pattern is suitable for confident beginners who already know how to make a magic ring, single crochet, increases, and decreases.
The separate pieces and assembly require patience, but the techniques are straightforward.
How long does it take to crochet a bunny?
A small bunny may take approximately four to six hours to complete, depending on your crochet experience and the time spent on assembly.
What yarn is best for crochet bunnies?
Smooth acrylic or cotton yarn is ideal for beginners because it provides clear stitch definition and comes in many colors.
What crochet hook size should I use?
A 3.5 mm hook is a good starting point for worsted-weight amigurumi yarn.
Adjust the hook size according to your tension and yarn.
Can I make a crochet bunny without a magic ring?
Yes. Make two chains and work six single crochet stitches into the second chain from your hook.
This creates an alternative starting circle.
Can I make the bunny’s ears longer?
Absolutely. Add more even rounds before beginning the decreases to create longer ears.
For example, you can add three or four rounds of 18 single crochet stitches to make the ears noticeably longer.
Do I need plastic safety eyes?
No. Embroidered eyes work beautifully and are preferable for toys intended for young children.
Can I make this bunny using chunky yarn?
Yes. Using chunky or chenille yarn with an appropriate hook will make the bunny larger and softer.
However, you’ll need more yarn and stuffing, and the final proportions may change slightly.
Can I sell finished crochet bunnies?
Generally, you can sell physical bunnies you make from this original pattern. Follow applicable toy-safety and labeling requirements, especially when selling products intended for children.
Can I use this bunny for Easter decorations?
Yes! The bunny is a lovely decoration for spring shelves, handmade Easter displays, and seasonal gift arrangements.
The optional crochet carrot adds an especially charming springtime detail.
Final Thoughts: Create Your Own Adorable Crochet Bunny
Learning how to crochet a bunny is a wonderful way to practice amigurumi techniques while making a cute and meaningful handmade project.
From shaping the head and long ears to creating the little paws, fluffy tail, and embroidered face, every step helps build your crochet skills.
This free crochet bunny pattern is ideal for anyone who loves handmade animals, seasonal decorations, or creative yarn projects.
Once you’ve completed your first bunny, experiment with different yarn colors, facial expressions, ear lengths, and accessories.
You might begin with a cream-and-pink bunny and eventually create a whole collection of colorful rabbits.
Remember that handmade crochet projects don’t have to be identical. Small differences in stitching, shaping, and embroidery give every bunny its own personality.
At Crochet Patterns Idea, we love sharing fun, practical patterns that encourage crocheters to keep learning and creating.
Choose your favorite yarn, pick up your crochet hook, and enjoy making your own adorable bunny!