Little Frog Amigurumi Crochet Pattern: Step-by-Step Tutorial
Crochet Frog Pattern: Easy Little Frog Amigurumi Tutorial
A Cute Handmade Crochet Frog with Big Eyes and Tiny Feet
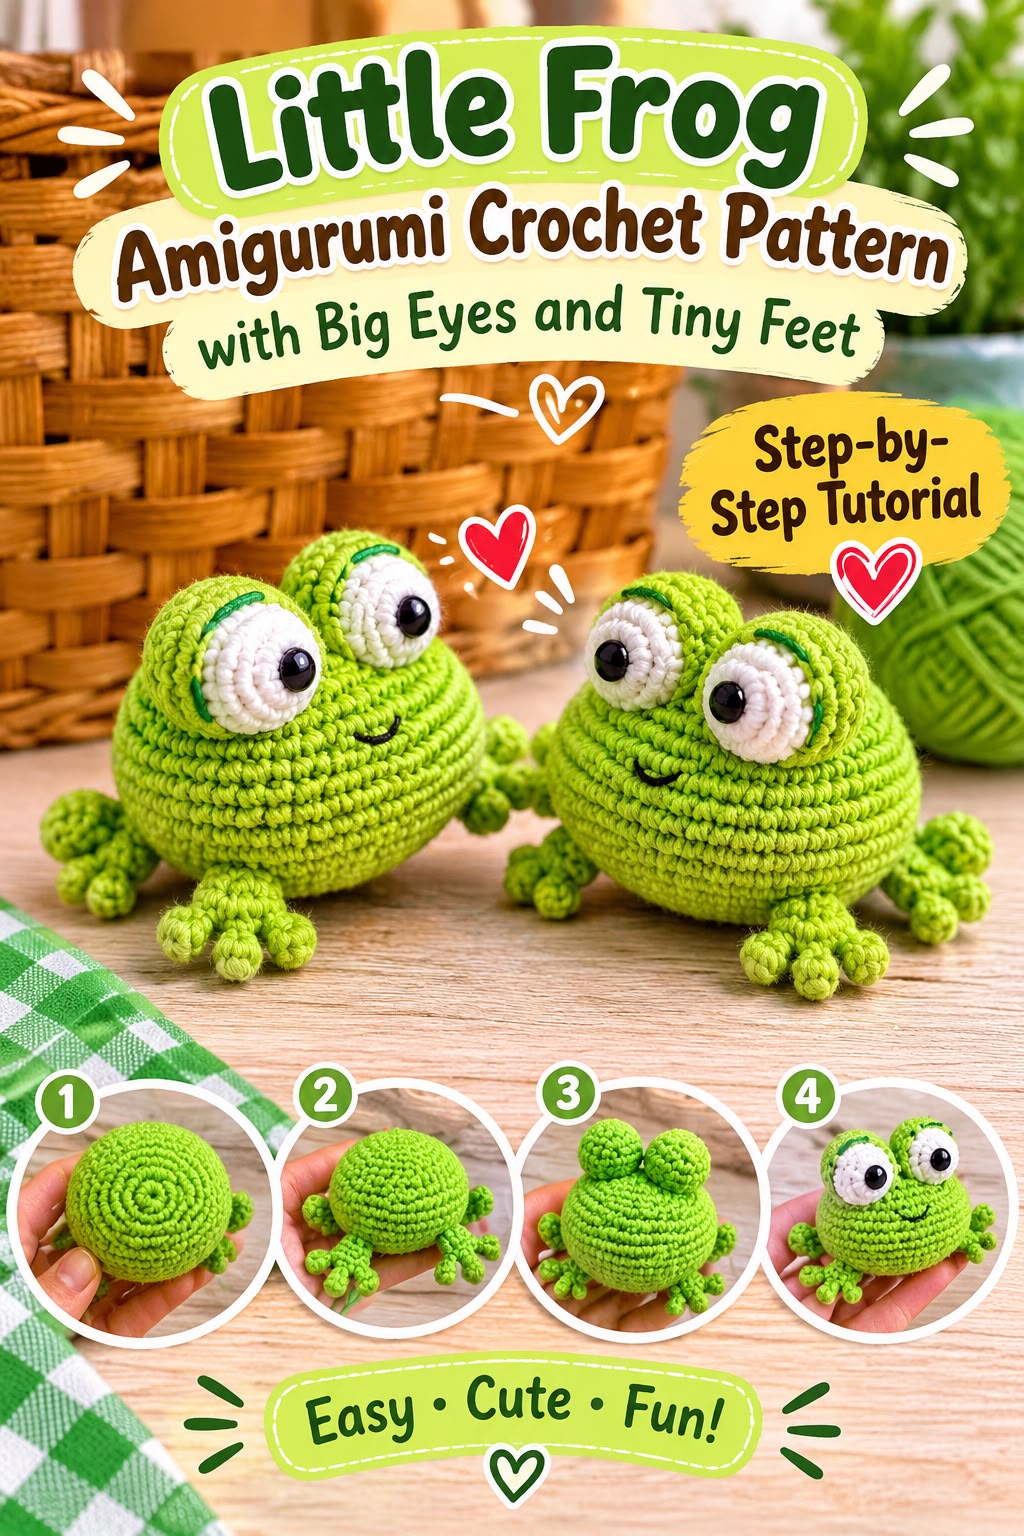
Create an adorable little frog with this step-by-step amigurumi crochet pattern. This charming design features a rounded green body, a white belly, raised eyes, four decorative paws, and a tiny red tongue. It is a lovely handmade toy for crochet lovers and makes a sweet gift, desk companion, or decorative accessory.
The pattern includes detailed instructions for crocheting each part separately, followed by an illustrated assembly guide. It uses basic crochet stitches and simple shaping techniques to create a finished frog approximately 7 cm (2.7 inches) tall.
Pattern Details
- Pattern name: Little Frog Amigurumi
- Project type: Amigurumi crochet toy
- Skill level: Intermediate beginner
- Crochet terminology: US terms
- Construction: Separate crocheted pieces joined during assembly
- Finished size: Approximately 7 cm (2.7 inches)
- Hook size: 2.0 mm
- Yarn: 100% cotton DK
- Main colors: Lime green, white, red, and a small amount of darker green
Materials and Tools
Before beginning, gather the following crochet supplies:
- 100% cotton yarn in lime green.
- White cotton yarn for the belly and eyes.
- A small amount of red yarn for the tongue.
- A small amount of darker green yarn for decoration.
- 2.0 mm crochet hook.
- Hollow-fiber stuffing.
- Two 6 mm safety eyes or black beads.
- Yarn needle with a large eye.
- Sewing pins.
- Scissors.
The original pattern uses Paintbox Yarns Cotton DK, with approximately 125 meters per 50 g ball. The listed shades are Lime Green (629), Paper White (601), Pillar Red (615), and Spearmint Green (626).
Important crochet tip: Work with tight, consistent stitches so the stuffing does not show through the fabric. If you notice small holes, try using a smaller crochet hook.
Crochet Abbreviations
This pattern uses standard US crochet terminology.
| Abbreviation | Meaning |
|---|---|
| ch | Chain |
| sc | Single crochet |
| dc | Double crochet |
| sl st | Slip stitch |
| inc | Increase (2 stitches in one stitch) |
| dec | Decrease |
| st | Stitch |
| sts | Stitches |
| MR | Magic ring |
Special stitch – Puff stitch: Work 4 double crochet stitches into the same stitch, then join them together to complete the puff.
Pattern notation: Instructions inside parentheses followed by a number indicate how many times to repeat the sequence. For example, (1 sc, inc) × 6 means to repeat one single crochet followed by one increase six times.
The body parts are worked in continuous spiral rounds unless otherwise indicated. Use a stitch marker to identify the beginning of each round.
1. Crochet the White Belly
The frog’s belly is crocheted separately using white cotton yarn and a 2.0 mm hook.
Work in continuous spiral rounds, increasing gradually to create a flat oval-shaped piece.
Belly Pattern
| Round | Instructions | Stitch count |
|---|---|---|
| 1 | 6 sc in MR | 6 |
| 2 | 2 sc in each st | 12 |
| 3 | (1 sc, inc) × 6 | 18 |
| 4 | (2 sc, inc) × 6 | 24 |
| 5 | (3 sc, inc) × 6 | 30 |
| 6 | (4 sc, inc) × 6 | 36 |
| 7 | (5 sc, inc) × 6 | 42 |
| 8 | (6 sc, inc) × 6 | 48 |
| 9 | (7 sc, inc) × 6 | 54 |
| 10 | (8 sc, inc) × 6 | 60 |
Finish with a slip stitch. Fasten off and cut the yarn.
Set the white belly aside while you work on the green body.
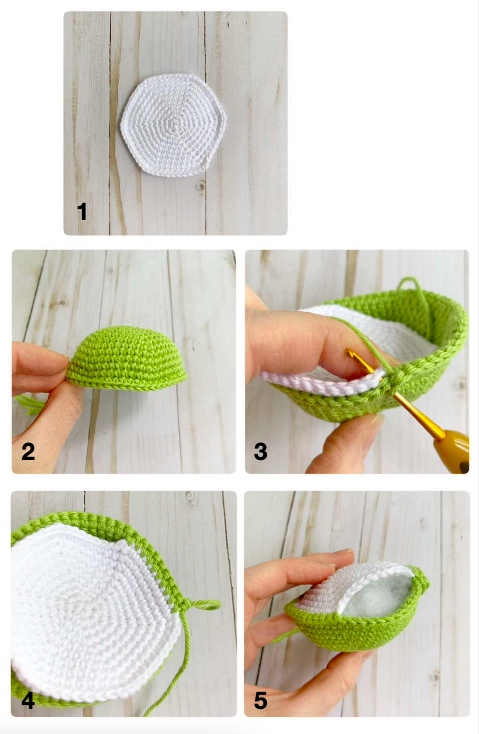
2. Crochet the Green Back and Body
Using lime green yarn and a 2.0 mm crochet hook, create the frog’s rounded back.
Work in continuous spiral rounds.
Back Pattern
| Round | Instructions | Stitch count |
|---|---|---|
| 1 | 6 sc in MR | 6 |
| 2 | 2 sc in each st | 12 |
| 3 | (1 sc, inc) × 6 | 18 |
| 4 | (2 sc, inc) × 6 | 24 |
| 5 | (3 sc, inc) × 6 | 30 |
| 6 | (4 sc, inc) × 6 | 36 |
| 7 | (5 sc, inc) × 6 | 42 |
| 8 | (6 sc, inc) × 6 | 48 |
| 9 | 48 sc | 48 |
| 10 | (7 sc, inc) × 6 | 54 |
| 11 | 54 sc | 54 |
| 12 | (8 sc, inc) × 6 | 60 |
| 13–14 | 60 sc in each round | 60 |
Do not fasten off after completing the back.
Joining the Belly and Back
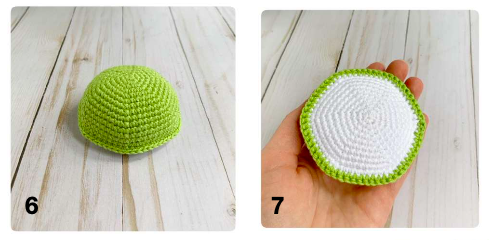
Place the wrong sides of the white belly and green back together, aligning their edges.
Insert the crochet hook through the corresponding loops of both pieces and work single crochet stitches around the entire edge.
As you crochet around the body, gradually add hollow-fiber stuffing. Distribute the filling evenly so the frog maintains its rounded shape.
Continue until the two pieces are securely joined. Finish with a slip stitch, fasten off, and hide the yarn tail inside the body.
3. Make the Two Eyes
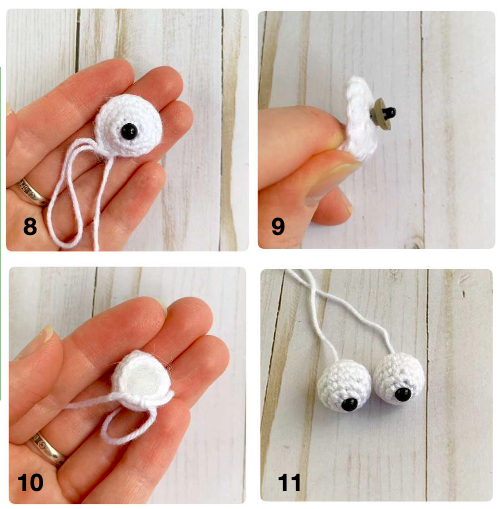
The frog’s large eyes give it its distinctive cute appearance.
You will need to crochet two identical eye pieces using white yarn.
Work in continuous spiral rounds.
Eye Pattern – Make 2
| Round | Instructions | Stitch count |
|---|---|---|
| 1 | 6 sc in MR | 6 |
| 2 | 2 sc in each st | 12 |
| 3 | (3 sc, inc) × 3 | 15 |
| 4–5 | 15 sc in each round | 15 |
| 6 | (3 sc, dec) × 3 | 12 |
| 7 | 6 decreases | 6 |
When making the magic ring, do not close it too tightly because you need to insert the safety eye through the center.
After completing Round 3, insert the 6 mm safety eye through the middle of the magic ring.
Continue working the remaining rounds. Add a small amount of stuffing before completing the final round.
Finish with a slip stitch, fasten off, and leave a long yarn tail for sewing.
Repeat the instructions to make the second eye.
Safety note: If making the frog for a young child, replace plastic safety eyes with securely embroidered eyes and avoid small detachable parts.
4. Crochet the Green Eyelids
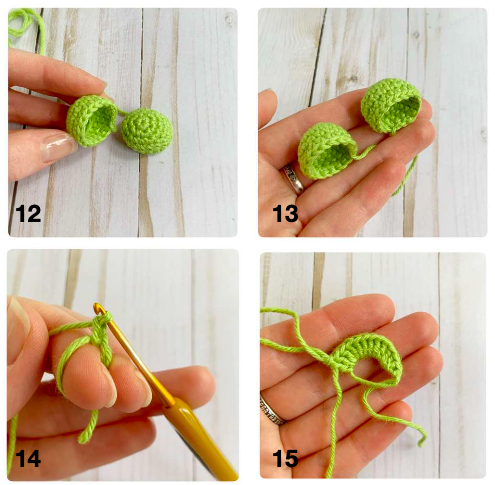
The eyelids are made using green yarn and form a decorative border around the white eyes.
Make two identical pieces.
Eyelid Pattern – Make 2
| Round | Instructions | Stitch count |
|---|---|---|
| 1 | 6 sc in MR | 6 |
| 2 | 2 sc in each st | 12 |
| 3 | (1 sc, inc) × 6 | 18 |
| 4–6 | 18 sc in each round | 18 |
Finish with a slip stitch.
Fasten off, leaving a sufficiently long yarn tail for sewing.
Place each white eye inside its corresponding green eyelid and sew the pieces together securely.
5. Crochet the Four Paws
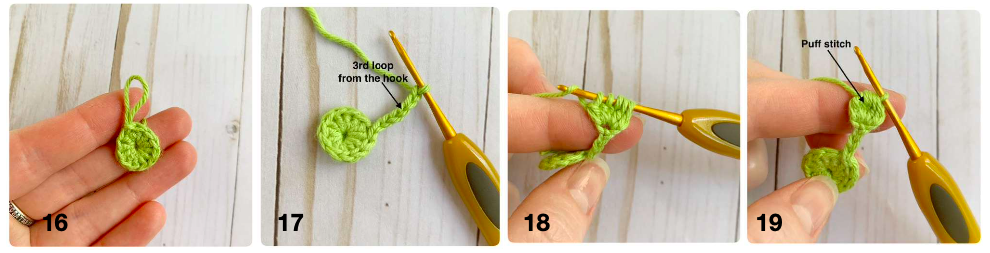
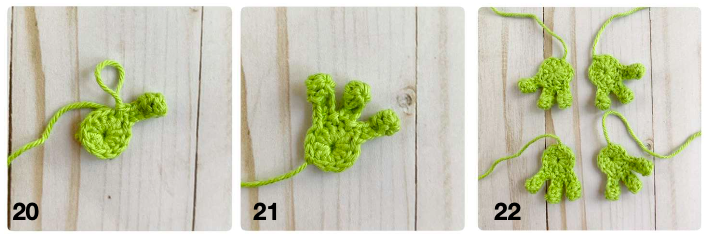
The frog has four small green paws. Each paw is made with a circular base and three decorative toes.
Use lime green yarn and a 2.0 mm crochet hook.
Paw Pattern – Make 4
Round 1: Circular Base
Chain 2.
Work 12 double crochet stitches into a magic ring.
Join with a slip stitch.
Stitch count: 12 dc.
Round 2: Create the Toes
Work 4 slip stitches around the base.
Next, make the first toe:
- Chain 6.
- Work one puff stitch into the third chain from the hook.
- Work one single crochet into the fourth chain.
- Work one single crochet into the fifth chain.
- Work one single crochet into the sixth chain.
- Slip stitch into the next stitch of the first round.
Repeat this toe-making sequence two more times to create three toes in total.
Finish by working 4 slip stitches around the remaining stitches of the circular base.
Fasten off and leave a long yarn tail for attaching the paw to the body.
Repeat until you have four paws.
6. Crochet the Small Red Tongue
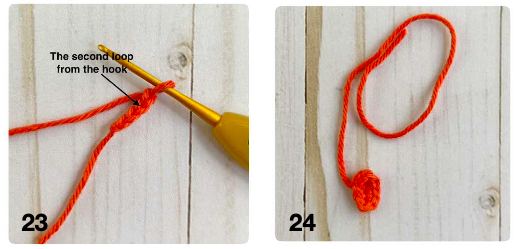
A tiny red tongue adds a playful detail to the finished frog.
Use red yarn and a 2.0 mm crochet hook.
Tongue Pattern
Chain 4.
Starting in the second chain from the hook:
- Work 2 single crochet stitches.
- Work 3 single crochet stitches into the last chain.
- Without turning, continue along the opposite side of the foundation chain.
- Work 1 single crochet.
- Work 1 increase.
You should have 8 stitches in total.
Finish with a slip stitch, fasten off, and leave a long tail for sewing.
7. Assemble the Little Frog
Once all the pieces are ready, you can begin assembling your crochet frog.
Take your time with this stage because the positioning of the eyes and paws gives the finished toy its character.
Step 1: Assemble the Eyes
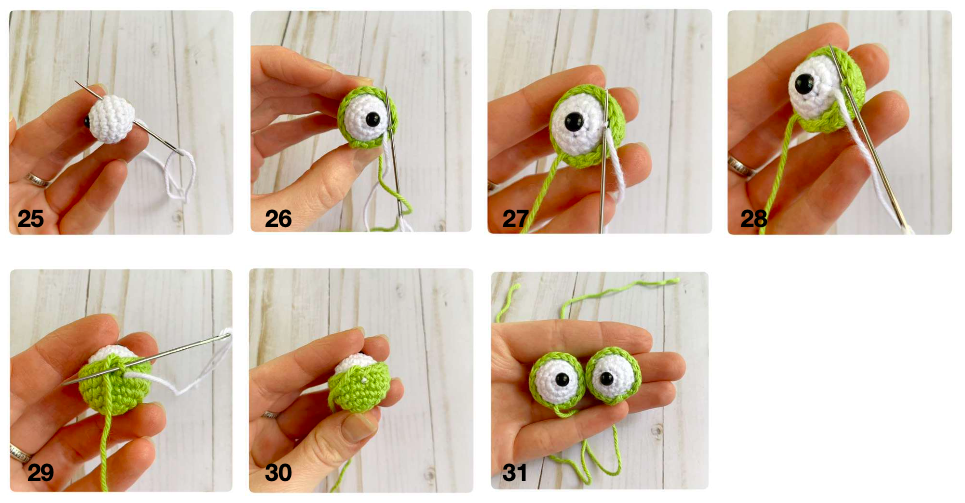
Place each white eye inside its green eyelid.
Use the remaining yarn tails to sew the pieces together securely.
Tie off the white yarn at the bottom of each eye and hide the loose ends.
Step 2: Attach the Eyes to the Body
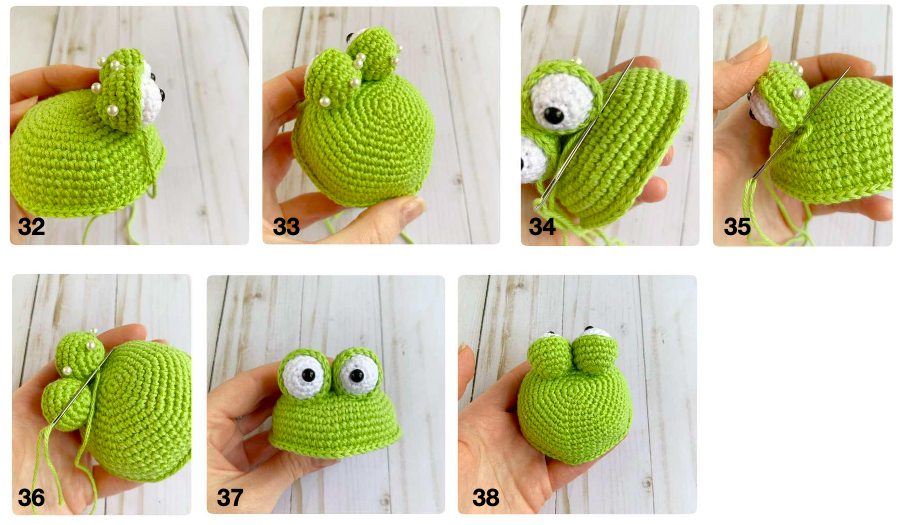
Position both eyes on the upper front section of the green body.
According to the original pattern, the eyes should be sewn onto the head/body between Rounds 4 and 8.
Use sewing pins to hold them in place before stitching.
Check that the eyes are symmetrical and facing forward.
Sew both eyes securely to the body.
Step 3: Attach the Front Paws
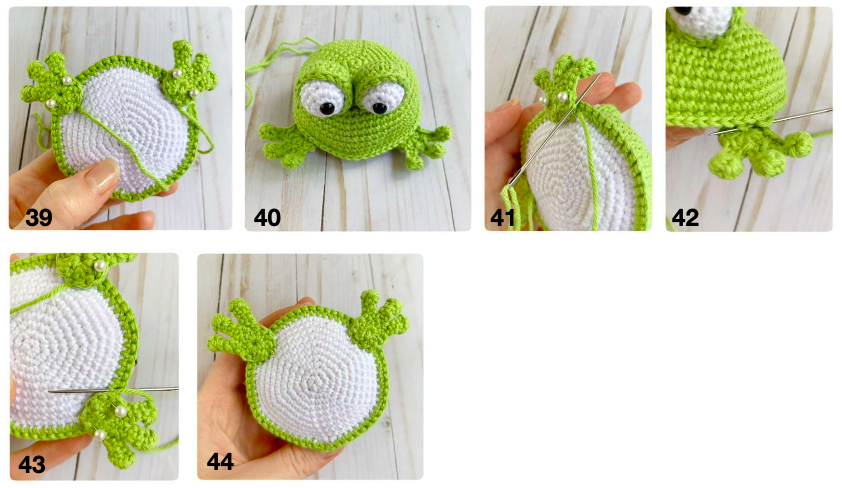
Position the two front paws at the bottom of the frog, keeping them symmetrical in relation to the muzzle.
Pin the paws in place before sewing.
Use the remaining green yarn tails to attach them securely.
Step 4: Attach the Back Paws
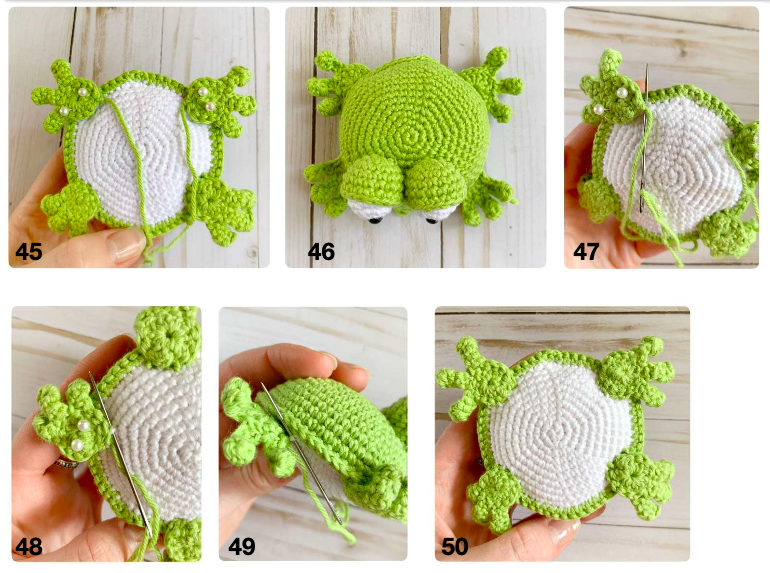
Position the remaining two paws on the lower back section of the frog.
Arrange them according to the placement shown in the original pattern photographs.
Sew each paw firmly to the body, making sure the frog can sit naturally.
Step 5: Attach the Tongue
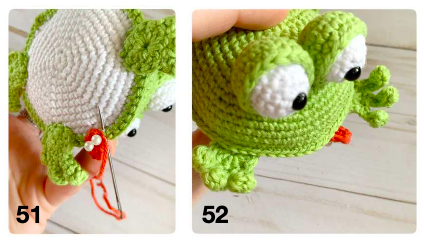
Position the small red tongue on the front of the frog’s muzzle.
Use the remaining red yarn tail to sew it into place.
Make sure it is securely attached.
Step 6: Add Decorative Details
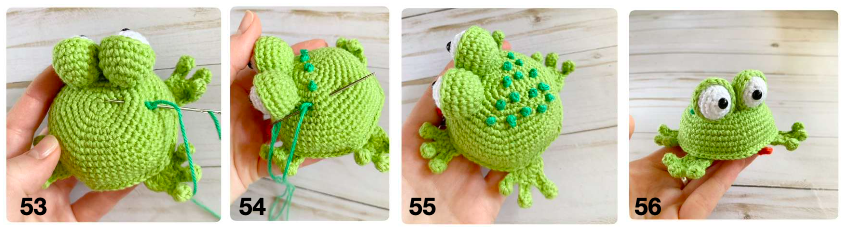
To finish the frog, use darker green yarn to embroider small French knots across the back.
These decorative details create a playful spotted appearance.
Alternatively, you can use small green beads for decoration, provided they are securely attached and appropriate for the intended recipient.
Your Little Frog amigurumi is now complete!
Finishing and Final Checks
Before considering your frog finished, check the following:
- Make sure both eyes are positioned evenly.
- Confirm that all four paws are securely attached.
- Check that the tongue is firmly sewn onto the muzzle.
- Hide all loose yarn ends inside the body.
- Make sure there are no visible stuffing holes.
- Check that the body is evenly stuffed and maintains its rounded shape.
- Secure all decorative details.
The finished frog should measure approximately 7 cm (2.7 inches) when made using the same yarn and hook size as the original pattern.
Frequently Asked Questions
1. What yarn is best for a crochet frog?
100% cotton DK yarn is recommended for this design. It provides good stitch definition and helps the small amigurumi pieces maintain their shape.
2. What size crochet hook should I use?
The original pattern uses a 2.0 mm crochet hook. You may need to adjust your hook slightly depending on your personal tension.
3. How big is the finished Little Frog?
The finished frog measures approximately 7 cm (2.7 inches) using the recommended materials.
4. Is this crochet frog suitable for beginners?
This is a small amigurumi project suitable for crocheters who understand basic stitches, increases, decreases, magic rings, and sewing crochet pieces together.
5. Can I use safety eyes instead of embroidering them?
Yes. The original pattern uses 6 mm safety eyes or black beads. For toys intended for young children, embroidered eyes are a safer alternative.
6. Why is my crochet frog showing stuffing through the stitches?
Your stitches may be too loose or your hook may be too large. Try a smaller hook and maintain tighter, consistent tension.
7. Can I change the frog’s colors?
Yes. You can experiment with different shades of green, pastel colors, or even make a colorful fantasy frog while keeping the original construction.
8. How do I make the frog’s eyes symmetrical?
Pin both eyes in position before sewing them onto the body. Compare their height and spacing from the front before attaching them permanently.
Final Thoughts
This Little Frog amigurumi is a charming small crochet project that combines simple shaping with fun decorative details. From its rounded green body and white belly to its raised eyes and tiny toes, every part contributes to its playful appearance.
The pattern is also a lovely way to practice working in spiral rounds, making increases and decreases, creating puff stitches, and assembling small crochet pieces.
Choose your favorite green yarn, prepare your crochet hook, and enjoy making your own little frog!