How to Crochet a Bee Pattern: Easy Step-by-Step Amigurumi Tutorial for Beginners
How to Crochet a Bee Pattern
Crochet Patterns Idea | Free Crochet Pattern | Beginner-Friendly DIY
Have you ever wanted to crochet a tiny, fluffy-looking bee with cheerful yellow stripes, adorable wings, and a sweet little smile? This easy crochet bee pattern is a wonderful place to start!
Whether you’re learning amigurumi for the first time or searching for a quick handmade gift, this beginner-friendly tutorial will walk you through creating your very own buzzing little friend. You’ll learn how to crochet the bee’s round body, create black and yellow stripes, attach white wings, and add cute facial details.
The best part? You don’t need advanced crochet skills or expensive supplies. Just a few yarn colors, a crochet hook, some stuffing, and a little creativity.

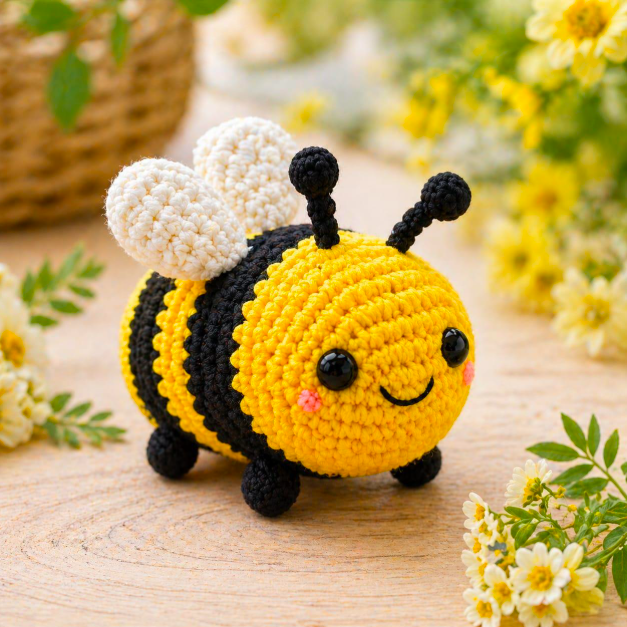
Finished project inspiration: a cheerful yellow-and-black amigurumi bee with white wings.
Quick Overview of the Crochet Bee Pattern
Skill level
Beginner
Estimated time
1.5–3 hours
Finished size
About 2.5–3.5 inches
Terminology
US crochet terms
The pattern uses continuous spiral rounds, single crochet stitches, increases, invisible decreases, simple color changes, and basic sewing.
Materials You’ll Need to Crochet a Bee
Before starting, gather your crochet supplies. This project uses a small amount of yarn, making it an excellent way to use leftover yarn from previous projects.

| Material | Purpose |
|---|---|
| Yellow worsted-weight yarn | Head and body sections |
| Black worsted-weight yarn | Stripes, smile, antennae |
| White worsted-weight yarn | Wings |
| Pink yarn (optional) | Rosy cheeks |
| 3.5 mm crochet hook | Creating firm stitches |
| Polyester fiberfill | Stuffing the bee |
| 6–8 mm safety eyes | Facial features |
| Yarn needle | Sewing and weaving ends |
| Scissors | Cutting yarn |
| Stitch marker | Tracking rounds |
Helpful tip: Choose a crochet hook slightly smaller than your yarn label recommends. Tighter stitches prevent stuffing from showing through the finished bee.
If you’re making a bee for a child under three, embroider the eyes instead of attaching plastic safety eyes, which can become choking hazards.
Crochet Abbreviations You Should Know
Understanding basic crochet abbreviations makes following the instructions much easier.
| Abbreviation | Meaning |
|---|---|
| MR | Magic ring |
| ch | Chain |
| sc | Single crochet |
| inc | Increase — 2 sc in one stitch |
| dec | Invisible decrease |
| sl st | Slip stitch |
| st(s) | Stitch(es) |
| FO | Fasten off |
| BLO | Back loops only |
| ( ) | Number of stitches at round end |
This pattern is worked in continuous rounds, so you won’t slip stitch to join each round unless specifically instructed.
Step-by-Step Crochet Bee Pattern
The following instructions create one small amigurumi bee. The head and striped body form a single crocheted piece, so there’s less sewing than in many traditional stuffed animal patterns.

Step 1: Start the bee’s body with yellow yarn
Step 1: Crochet the Front of the Bee
Begin with yellow yarn. Make a magic ring and crochet six single crochet stitches into it. Pull the loose yarn end to close the ring tightly.
Follow these rounds:
- Round 1: 6 sc in MR (6)
- Round 2: Inc in every stitch (12)
- Round 3: [1 sc, inc] repeat 6 times (18)
- Round 4: [2 sc, inc] repeat 6 times (24)
- Round 5: [3 sc, inc] repeat 6 times (30)
- Rounds 6–8: Sc in every stitch (30 each round)
At this point, your work should resemble a shallow yellow cup with a rounded front.
Use a stitch marker to identify the first stitch of each round, especially if you’re new to crocheting in a spiral.
Avoid pulling the yarn too tightly, as this can make inserting your hook difficult. Aim for stitches that are firm and even.
Step 2: Add the Bee’s Black and Yellow Stripes

Now comes one of the most enjoyable parts of this crochet bee tutorial: making its signature stripes.
Continue crocheting the same body, changing colors as follows:
| Round | Yarn color | Instructions |
|---|---|---|
| 9 | Black | 30 sc |
| 10 | Black | 30 sc |
| 11 | Yellow | 30 sc |
| 12 | Yellow | 30 sc |
| 13 | Black | 30 sc |
| 14 | Black | 30 sc |
| 15 | Yellow | 30 sc |
Each round contains exactly 30 stitches.
To change colors neatly, work the final single crochet of the preceding round until two loops remain on your hook. Yarn over with your new color and pull it through both loops.
This creates a cleaner transition between the yellow and black yarn.
Since amigurumi is worked in spirals, a slight step where colors meet is normal. Position the color-change seam along the underside of the bee to make it less noticeable.
You can carry the unused yarn loosely along the inside for short sections or cut and secure it at each change. Avoid pulling carried yarn tight, as that could distort the bee’s body.
Step 3: Add the Eyes and Stuff the Body

Before closing the bee, attach the eyes to the yellow front section.
For a friendly facial expression, place the eyes approximately between rounds 6 and 7, spaced about five or six stitches apart. Use the center of your magic ring as the front of the bee, and adjust the placement until both eyes look symmetrical.
If you’re using embroidered eyes, you can add them after finishing the body instead.
Continue shaping the back:
- Round 16: [3 sc, dec] repeat 6 times (24)
- Round 17: [2 sc, dec] repeat 6 times (18)
Begin inserting small pieces of fiberfill into the bee. Spread the stuffing evenly instead of adding one large clump.
Then finish decreasing:
- Round 18: [1 sc, dec] repeat 6 times (12)
- Round 19: Dec around (6)
Add any remaining stuffing before the opening becomes too small.
Fasten off, leaving a yarn tail approximately six inches long. Thread the tail through a yarn needle, pass it through the front loops of the remaining six stitches, and pull gently to close the opening.
Weave the tail securely inside the body.
Important: Do not overstuff your bee. A firm but gently rounded shape is ideal. Excess stuffing may stretch the crochet stitches and create visible gaps.
Step 4: Crochet Two White Bee Wings

The tiny wings make your crochet bee instantly recognizable.
Using white yarn, create two matching wings with this simple oval-style pattern.
Wing pattern — make two:
- Round 1: Work 6 sc into a magic ring (6).
- Round 2: Make 2 sc in each stitch (12).
- Round 3: [1 sc, inc] repeat 6 times (18).
- Round 4: [1 sc, dec] repeat 6 times (12).
Fasten off, leaving a long tail for sewing.
Gently flatten each wing into a rounded oval. You do not need to stuff the wings. Flattening gives them a delicate appearance and helps them sit comfortably against the body.
Make sure both wings have approximately the same shape and size.
For a smaller bee, you can leave out round 3 and work one round of 12 sc before fastening off. This creates smaller, more delicate wings.
Step 5: Make Two Cute Bee Antennae

Bee antennae are optional, but they give the finished toy extra personality.
Using black yarn:
- Create a slip knot and chain six.
- Starting in the second chain from your hook, make one single crochet in each of the five remaining chains.
- Fasten off, leaving a tail for sewing.
- Repeat to make a second antenna.
For rounded antenna tips, add a tiny black yarn knot at the outer end. Secure it carefully so it cannot come undone. Alternatively, leave the antennae straight for a simpler look.
Avoid inserting wire into antennae if the finished bee will be used as a child’s toy.
Step 6: Embroider the Bee’s Smile and Cheeks

A cheerful face turns your handmade bee into a lovable little character.
Cut a length of black embroidery thread or thin yarn and thread it through your yarn needle.
Position a small curved smile approximately two or three rows below the eyes. Create the smile using two or three tiny embroidery stitches, shaping it into a gentle upward curve.
To add rosy cheeks, use pink yarn and make one or two short horizontal stitches just below the outer corner of each eye.
You can also customize the face by adding sleepy eyes, eyebrows, or a tiny embroidered heart.
Keep facial stitches secure, and hide all yarn ends inside the body.
Step 7: Sew the Wings and Antennae in Place

Now assemble your bee.
Place both wings on top of the body, around rounds 10–13, with the wing bases close together. The wings should point slightly outward and backward.
Thread the yarn tail from the first wing through your needle. Make several small stitches through the base of the wing and the bee’s body. Repeat with the second wing.
Next, sew the antennae toward the upper front of the head, slightly above the eyes. Leave enough space between them to maintain a balanced appearance.
Check your bee from the front, side, and top before securing all the yarn ends.
Step 8: Finish and Shape Your Crochet Bee

Your adorable crochet bee is complete!
Gently squeeze and shape the stuffed body with your hands. Smooth any uneven areas, adjust the wings, and tuck away loose yarn ends.
You can leave your bee as a small decorative plushie or add a hanging loop for a bag charm. If you’re making it as a gift, consider pairing it with a handwritten note or a tiny crocheted flower.
Every handmade bee will have its own character, so don’t worry if yours looks slightly different from the example.
Visual Crochet Bee Pattern: Illustrated Tutorial
Here’s a single illustrated reference you can use alongside the written instructions. It brings together the supplies, crochet abbreviations, body construction, wings, antennae, and final assembly.
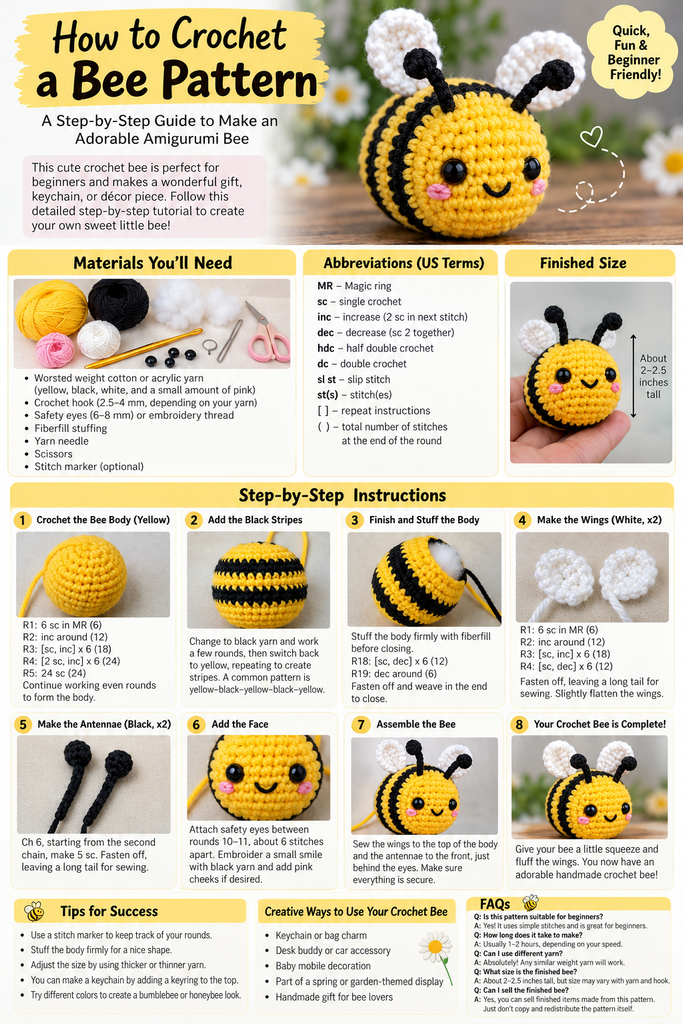
The visual guide is illustrative. Follow the detailed round-by-round instructions above for consistent stitch counts and construction.