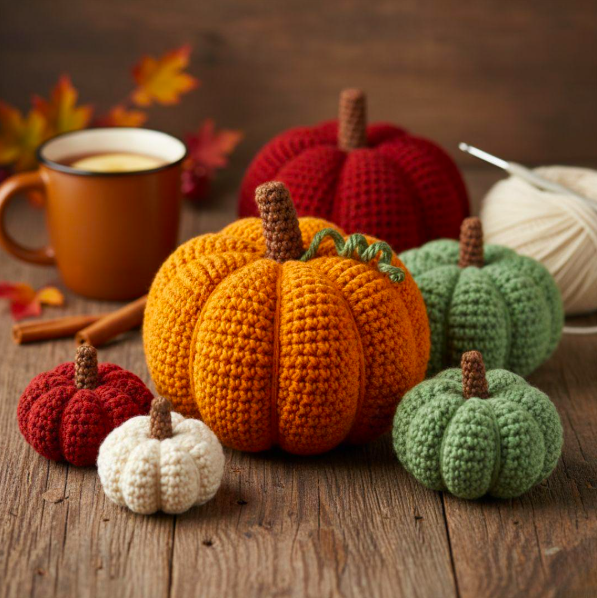
How to Crochet Halloween Pumpkins: Easy Step-by-Step Tutorial for Beginners
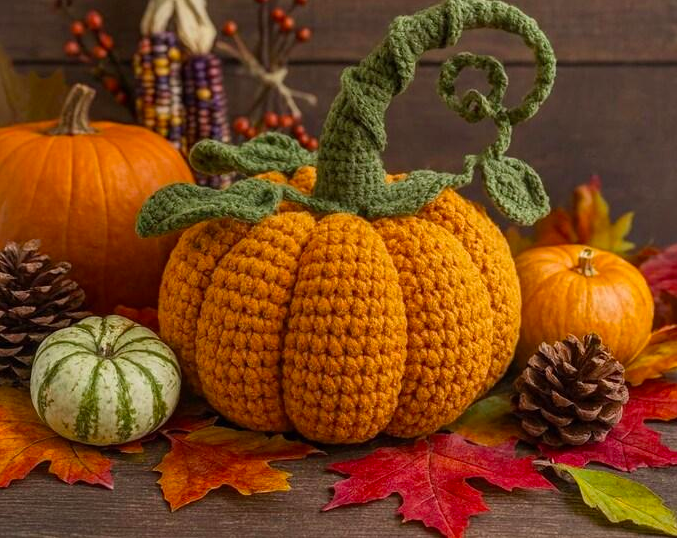
Crochet Halloween pumpkins are a beautiful way to decorate your home for autumn while enjoying a relaxing handmade project. With their soft texture, rounded shape, and classic orange color, these little pumpkins look wonderful on shelves, coffee tables, mantels, and Halloween party displays. You can also make them in different sizes and colors to create a unique collection of seasonal decorations.
The best part is that you do not need advanced crochet skills to make your own pumpkin. This beginner-friendly crochet pumpkin pattern uses basic stitches, a simple rectangular piece of crochet fabric, and a few easy finishing techniques. You can customize the finished pumpkin with a brown stem, green leaves, or decorative yarn details.
In this tutorial, you will learn how to crochet a Halloween pumpkin from start to finish. We will cover the materials you need, the stitches used, the complete written pattern, step-by-step assembly instructions, and helpful tips for making your pumpkin look neat and professional.
Whether you are making your first crochet decoration or adding another project to your autumn collection, this easy crochet pumpkin is a fun project to try.
Why Make Your Own Crochet Halloween Pumpkins?
Handmade pumpkins are a versatile addition to Halloween and autumn decorations. Unlike real pumpkins, crocheted versions can be stored and reused for many seasons when cared for properly.
Here are a few reasons to try this project:
- Beginner-friendly construction: The main pumpkin is made from a simple rectangle.
- Customizable sizes: You can make miniature pumpkins or larger decorative versions.
- Great for leftover yarn: Small amounts of orange, cream, green, or brown yarn can be useful.
- Reusable seasonal decor: Store your finished pumpkins and bring them out every autumn.
- Personalized designs: Experiment with traditional Halloween colors or create a softer, modern autumn palette.
You can display a single pumpkin as a small accent or combine several pumpkins of different sizes to create a beautiful seasonal arrangement.
Materials Needed for a Crochet Pumpkin
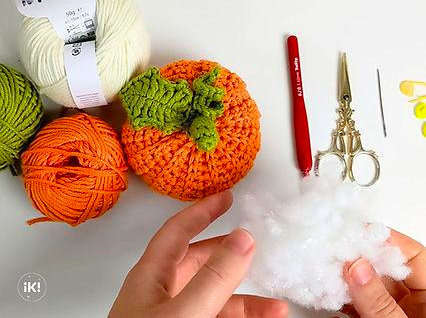
Before starting, gather your crochet supplies. Most of these materials are available at craft stores, and you may already have some at home.
1. Yarn
Choose a medium-weight yarn, such as a category 4 worsted-weight yarn, for a small decorative pumpkin.
Orange is the traditional choice, but cream, mustard yellow, rust, dark green, and dusty pink can also look attractive.
You will need approximately 30–60 yards of yarn for the main pumpkin, depending on your tension and the final size. A small amount of brown yarn is useful for the stem, and green yarn can be used for leaves.
These amounts are estimates rather than strict requirements, so having a little extra yarn is helpful.
2. Crochet hook
A 4 mm or 4.5 mm crochet hook is a reasonable starting point for medium-weight yarn. Choose a hook that produces a firm fabric without making your stitches difficult to work.
For stuffed decorations, a slightly tighter fabric helps prevent the stuffing from showing through the stitches.
3. Stuffing
Polyester fiberfill is a common choice for stuffed crochet pumpkins. You can also use another suitable clean stuffing material designed for craft projects.
Add the stuffing gradually so you can control the pumpkin’s shape.
4. Yarn needle
A yarn needle is needed to sew the rectangle into a tube, gather the openings, attach the stem, and weave in loose ends.
5. Scissors
Use sharp scissors to cut the yarn neatly when you finish the project.
6. Stitch marker
A stitch marker is optional for this pattern because you will work in rows rather than continuous rounds. However, it can help you keep track of your progress.
Crochet Abbreviations Used in This Pattern
This tutorial uses US crochet terminology.
| Abbreviation | Meaning |
|---|---|
| ch | Chain |
| sc | Single crochet |
| BLO | Back loop only |
| st | Stitch |
| sl st | Slip stitch |
| rep | Repeat |
Back loop only (BLO) means that you insert your hook through the back loop of each stitch instead of both loops. This creates a ribbed texture that gives the finished pumpkin a soft, ridged appearance.
If you are new to crochet, practice a few single crochet stitches before starting the main piece.
Finished Size
The pumpkin made with the basic pattern below will measure approximately 6–8 inches tall or wide depending on your yarn, tension, and assembly. Its final dimensions may vary because the fabric is gathered and stuffed.
You can adjust the size by changing the number of chains or the number of rows. For your first pumpkin, following the basic instructions is the easiest way to become familiar with the construction.
Step-by-Step Crochet Halloween Pumpkin Pattern
Step 1: Make the foundation chain
Using your orange yarn, make a slip knot and crochet 36 chains.
This foundation chain determines the approximate height of your pumpkin.
Foundation: Ch 36.
If your chain is unusually tight, try using a slightly larger hook for the foundation chain. The bottom edge should be flexible enough to gather later.
Step 2: Crochet the first row
Insert your hook into the second chain from the hook.
Work one single crochet into each chain across the row.
You should have 35 single crochet stitches when you finish.
Row 1: Ch 1, turn, sc in each stitch across. (35 sc)
The turning chain does not count as a stitch in this pattern.
Step 3: Create the ribbed texture
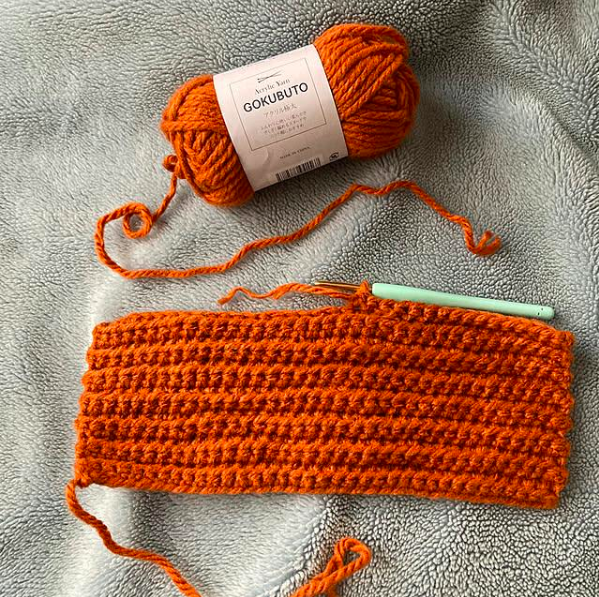
For the next row, chain one and turn your work.
Work one single crochet into the back loop only of each stitch across the row.
This creates the ridges that will become the pumpkin’s natural-looking sections.
Row 2: Ch 1, turn, sc in BLO across. (35 sc)
Repeat Row 2 until you have completed 25 rows in total.
Keep your stitches reasonably even. Consistent tension will make the fabric easier to sew and gather.
Important: Do not increase or decrease stitches. Each row should contain 35 single crochet stitches.
Step 4: Check the rectangle
Lay your finished crochet piece on a flat surface.
You should have a ribbed rectangle with 35 stitches across and 25 rows from top to bottom.
The exact dimensions will depend on your yarn and tension. If the fabric seems too narrow or too wide, you can adjust the pattern on your next pumpkin.
Fasten off, leaving a long yarn tail for sewing.
Step 5: Join the rectangle into a tube
Fold the rectangle so that its two short side edges meet.
Using your yarn needle and the long yarn tail, sew the edges together from one end to the other. A whip stitch or mattress stitch can work well.
You should now have a tube with an opening at the top and another at the bottom.
Try to keep the seam neat, because it will help the pumpkin hold its shape.
Step 6: Gather the first opening
Thread a long piece of orange yarn onto your yarn needle.
Pass the needle in and out around the stitches along one open edge of the tube. Work through the fabric close to the edge, making small, even stitches.
Once you have gone all the way around, gently pull the yarn to close the opening.
Secure the gathered end with several firm stitches. This will form the bottom of your pumpkin.
Make sure the opening is secure before adding stuffing.
Step 7: Add the stuffing
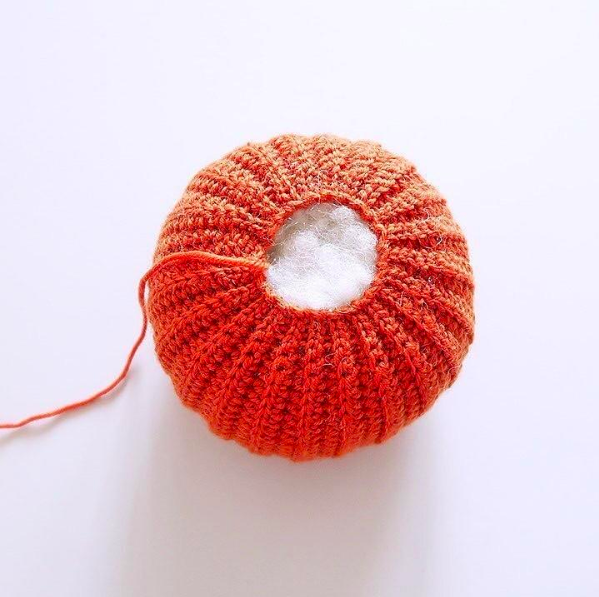
Turn the tube right side out if necessary so that the ribbed texture is visible.
Begin filling the pumpkin with small amounts of fiberfill.
Distribute the stuffing evenly around the inside rather than pushing it all into the center. This helps create a rounded shape and prevents large empty spaces.
Continue until the pumpkin feels pleasantly full but not overly firm.
Avoid stretching the stitches by adding too much stuffing. A slightly soft pumpkin is often easier to shape than one that is packed too tightly.
Step 8: Gather the top opening
Using another length of yarn, sew around the remaining open edge in the same way you gathered the bottom.
Pull the yarn gently to close the opening.
Before securing it completely, adjust the stuffing with your fingers so the pumpkin has a rounded shape.
Once the opening is closed, secure the yarn with several small stitches and weave in the remaining end.
Your basic crochet pumpkin is now complete.
Step 9: Shape the pumpkin ridges
This step is optional, but it can make a big difference to the finished appearance.
Thread a long piece of matching yarn onto your needle. Starting near the top center, pass the yarn down through the pumpkin and bring it back up near the same point.
Pull the yarn gently to create a shallow indentation.
Repeat this process at several evenly spaced points around the pumpkin. The yarn will draw the top and bottom slightly closer together, creating the familiar segmented pumpkin shape.
Do not pull too tightly. The goal is to form gentle grooves rather than flatten the pumpkin.
Secure the yarn at the top and weave in any loose ends.
Step 10: Make the pumpkin stem
To make a simple stem, switch to brown yarn.
Chain 7. Starting in the second chain from the hook, work one single crochet in each chain across.
You should have 6 single crochet stitches.
Fasten off, leaving a long yarn tail. Roll the small strip into a short tube and sew its edges together, or fold it into a compact shape.
Attach the stem securely to the top center of the pumpkin.
For a thicker stem, you can make a slightly wider strip or use a short, firm crocheted cylinder.
Step 11: Add leaves or decorative details
To give your pumpkin a more finished appearance, add one or two small green leaves.
You can crochet simple leaves using chains and slip stitches, or use a small leaf pattern you already know.
Attach the leaves beside the stem using a yarn needle.
You can also experiment with a small bow, embroidered details, or contrasting yarn accents. Keep the decoration simple if you want a classic pumpkin appearance.
Congratulations! Your handmade crochet Halloween pumpkin is ready to display.
How to Customize Your Crochet Pumpkin
Once you understand the basic construction, it is easy to create different versions of the same design.
Make a miniature pumpkin
For a smaller pumpkin, use thinner yarn and a smaller hook, or reduce the number of chains and rows. Make sure you maintain the same number of stitches across every row.
Miniature pumpkins work well in decorative bowls, on shelves, or as part of a Halloween centerpiece.
Create a large statement pumpkin
For a larger pumpkin, increase the foundation chain and add more rows. Make a small sample first to estimate the finished size.
Remember that increasing both dimensions will require more yarn and stuffing.
Try different autumn colors
Orange is traditional, but cream, rust, olive green, mustard, and burgundy can create a sophisticated autumn palette.
A collection of pumpkins in complementary shades can look especially attractive on a wooden shelf or mantelpiece.
Add a curly stem
If you want a playful appearance, crochet a narrow chain in green or brown yarn and work several stitches into it to create a curled effect.
Attach the finished detail near the center of the pumpkin.
Make a pumpkin family
Create three pumpkins in small, medium, and large sizes. Arrange them together, placing the largest pumpkin at the back and the smaller ones toward the front.
This simple styling technique creates depth without requiring additional decorations.
Tips for Making Your Crochet Pumpkins Look Professional
A few finishing techniques can help your project look neat and well made.
Keep your tension consistent. Uneven stitches can make the rectangle difficult to assemble. If necessary, practice with a small sample before starting the main piece.
Use a firm fabric. If the gaps between stitches are large, try a smaller hook. You want the stuffing to remain inside the pumpkin.
Distribute the stuffing evenly. Add small amounts at a time and shape the pumpkin with your hands as you work.
Secure your yarn ends. Loose ends can unravel over time, so weave them through several stitches before trimming them.
Make the seam discreet. Neat sewing helps the pumpkin maintain its shape and gives it a cleaner finish.
Avoid excessive stuffing. Overfilling can stretch the fabric and make it harder to create the natural pumpkin grooves.
How to Decorate Your Home with Crochet Halloween Pumpkins
After making your pumpkins, you can use them in several ways around your home.
Decorate a mantelpiece
Arrange pumpkins of different sizes along a mantelpiece. Add a few autumn leaves or other suitable decorations to create a seasonal display.
Create a Halloween table centerpiece
Place several crochet pumpkins in the center of a dining table. Use a tray to keep the arrangement organized and easy to move.
Style a bookshelf
A small crochet pumpkin can add a seasonal accent to a bookshelf, especially when placed beside autumn-themed books or other handmade decorations.
Decorate an entryway
Place your pumpkins on a console table near the entrance. Pair them with a seasonal wreath or a small basket of decorative leaves.
Make a handmade gift
A crochet pumpkin can be a thoughtful autumn gift for someone who enjoys handmade crafts or seasonal home decorations.
If you are giving pumpkins as gifts, consider making a matching set in the recipient’s favorite colors.
Keep yarn decorations away from open flames, hot bulbs, and other heat sources. If you display them around children or pets, avoid loose parts that could be swallowed.
How to Care for and Store Crochet Pumpkins
Proper storage helps handmade decorations last longer.
Before putting your pumpkins away, check the yarn care label and clean them according to the manufacturer’s recommendations. If the yarn is washable, gentle cleaning may be suitable, but always consider the stuffing and any attached decorations.
Allow the pumpkin to dry completely before storing it. Moisture trapped inside a stuffed decoration can lead to unpleasant odors or damage.
Store your pumpkins in a clean, dry container away from direct sunlight and excessive heat. Avoid placing heavy objects on top of them, as this can flatten the stuffing and distort the shape.
When the next autumn season arrives, remove the pumpkins and reshape them gently with your hands.
Frequently Asked Questions About Crochet Halloween Pumpkins
Is this crochet pumpkin pattern suitable for beginners?
Yes. The main body uses single crochet stitches worked in rows, followed by simple sewing and gathering. Beginners who understand the basic chain and single crochet can use this project to practice shaping and finishing.
How much yarn do I need to crochet a pumpkin?
For the small pumpkin described in this tutorial, approximately 30–60 yards of medium-weight yarn is a useful estimate. The exact amount depends on your yarn, tension, hook size, and any additional details.
Can I crochet a pumpkin without stuffing?
Yes. You can make a flat pumpkin appliqué by crocheting a pumpkin-shaped piece and adding a stem. Flat pumpkins are useful for garlands, wall decorations, and other projects where a three-dimensional shape is not necessary.
What is the best yarn for crochet pumpkins?
Medium-weight acrylic yarn is a practical option for many decorative pumpkins because it is available in a wide range of colors. Cotton yarn can also work, depending on the desired texture. Choose a yarn that creates a firm fabric and is suitable for your intended use.
How do I make my crochet pumpkin look more realistic?
The most effective techniques are adding a stem, creating several shallow grooves, and distributing the stuffing evenly. Using different shades of orange or rust can also create visual interest.
Why does my crochet pumpkin look uneven?
Uneven stitches, inconsistent tension, poorly distributed stuffing, or a loosely secured seam can affect the shape. Try keeping the same stitch count in every row, adding stuffing gradually, and tightening the gathered openings carefully.
Can I make crochet pumpkins in different sizes?
Yes. You can change the foundation chain and number of rows to create different dimensions. Make a small sample first, because yarn weight and tension influence the final size.
How can I use leftover yarn for Halloween decorations?
Leftover yarn is perfect for miniature pumpkins, stems, leaves, flat pumpkin appliqués, and small Halloween garlands. Combining several yarn colors can also create a coordinated collection of seasonal decorations.
Are crochet pumpkins suitable for outdoor decorations?
They are generally better suited to indoor use because yarn can absorb moisture and collect dirt. If you display them outside, choose a sheltered area and bring them indoors when the weather is wet.
Final Thoughts
Learning how to crochet Halloween pumpkins is a rewarding way to create handmade seasonal decorations for your home. With a simple rectangle, basic crochet stitches, and a little stuffing, you can make a pumpkin that looks attractive on shelves, tables, and autumn displays.
The pattern is also easy to customize. Change the yarn colors, adjust the size, add a decorative stem, or create a matching collection to suit your style.
If this is your first crochet pumpkin, focus on keeping your stitches even and taking your time with the assembly. Once you have completed one, you can experiment with different shapes and sizes to build a collection of handmade Halloween decorations.
Gather your yarn and crochet hook, choose your favorite autumn colors, and enjoy creating something special for the season.
Happy crocheting!