Easy Crochet Scarf Pattern for Beginners (Step-by-Step Tutorial)
Introduction
If you have ever wanted to make something wearable with your own hands, a scarf is the perfect place to start. There is no shaping, no counting stitches around a curve and no sewing at the end. You make a chain, work back and forth in straight rows, and keep going until it is long enough to wrap around your neck.
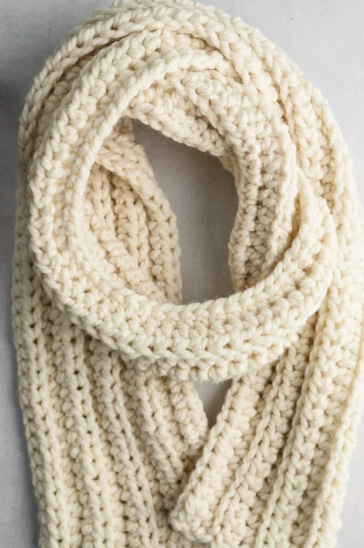
This easy crochet scarf pattern uses a single stitch, the half double crochet, and it works up quickly with a chunky yarn. The fabric it makes is soft, slightly textured and warm without being heavy. Most beginners finish it over a weekend, and many of my readers say it was the project that finally made crochet click for them.
The finished scarf measures about 20 cm wide and 150 cm long, but because it is just rows, you can make it narrower, wider, shorter or longer without changing a single instruction. That flexibility is why I recommend it as a first project and why it makes a lovely last-minute gift.
[Photo 1: finished grey or cream crochet scarf loosely folded on a wooden chair, soft daylight]
Alt text: finished handmade crochet scarf in chunky yarn folded on a wooden chair
Materials and tools
- Yarn: about 250 g of chunky (weight 5) yarn, roughly 350 metres. A soft wool blend or acrylic works well. Avoid very dark colours for your first scarf, because the stitches are harder to see.
- Hook: 8 mm (US L-11). If your stitches feel very tight, go up one size.
- Scissors for cutting the yarn.
- Tapestry needle for weaving in the ends.
- Measuring tape to check width and length as you go.
- Optional: a stitch marker for the first stitch of each row.
[Photo 2: skein of chunky yarn, an 8 mm hook, scissors and a tapestry needle on a plain surface]
Alt text: materials for an easy crochet scarf including chunky yarn and an 8 mm hook
Abbreviations (US terms)
| Abbreviation | Meaning |
|---|---|
| ch | chain |
| st | stitch |
| hdc | half double crochet |
| sl st | slip stitch |
| yo | yarn over |
| FO | fasten off |
Size and gauge
The finished scarf is about 20 cm wide and 150 cm long. In half double crochet with an 8 mm hook, 10 stitches measure about 8 cm. Gauge is not critical for a scarf, so do not worry if yours is a little different. Just check the width after your first few rows and adjust the starting chain if you want a different size.
Step-by-step easy crochet scarf pattern
The whole scarf is one stitch repeated in rows. Once you have done two rows, you have learned the entire pattern.
Step 1: Make a slip knot and the foundation chain
Make a slip knot and place it on your hook. Chain 26. Keep your chain relaxed. If it is too tight, the bottom edge of the scarf will pull in and look narrower than the rest. A good test is that you can easily slide your hook into each chain.
[Photo 3: close-up of a long foundation chain lying flat, with the hook in the last loop]
Alt text: crochet foundation chain of 26 stitches with an 8 mm hook for a beginner scarf
Step 2: Work the first row
Yarn over, then insert your hook into the third chain from the hook. Yarn over and pull up a loop (three loops on the hook). Yarn over and pull through all three loops. That is one half double crochet.
Work one hdc in each remaining chain across. You should finish with 24 stitches. Do not count the two skipped chains at the start. They only act as the base of the row.
[Photo 4: hook inserted into a chain with three loops on the hook, showing the half double crochet step]
Alt text: working a half double crochet stitch with three loops on the hook
Step 3: Turn and start the second row
Chain 2 and turn your work so the other side faces you. This chain is a turning chain. It lifts the yarn to the height of the next row, but it does not count as a stitch. Work one hdc into the first stitch at the base of the chain, then one hdc in each stitch across.
At the end of the row, work your last hdc into the very last stitch. The top edge of the previous row’s turning chain is easy to miss, but you do not need to work into it. Count again: 24 stitches.
[Photo 5: the scarf after three rows, showing straight edges and the turning chain at the side]
Alt text: crochet scarf after three rows with straight edges and a turning chain
Step 4: Repeat until it is long enough
Keep repeating Step 3: chain 2, turn, hdc in each stitch across. After every few rows, count your stitches and make sure you still have 24. A scarf with wavy sides usually means you added or skipped a stitch somewhere.
For a standard adult scarf, continue until the piece is about 150 cm long. That takes roughly 110 to 120 rows, depending on your tension. Hold the scarf against your body every so often to see how it hangs. If you want something shorter to wear as a neck warmer, stop at 90 cm.
This is the relaxing part. Put on a podcast, and let your hands find their rhythm.
Step 5: Finish the scarf
When it is as long as you like, cut the yarn, leaving a 15 cm tail. Pull the tail through the last loop on your hook and tighten gently. This is called fastening off, and it locks the final stitch in place.
Step 6: Weave in the ends
Thread the tail onto your tapestry needle. Weave it through the stitches along the edge for about 6 cm, going in one direction and then back the other way. This stops it from coming loose. Do the same with the tail at the starting edge. Trim any leftover ends close to the fabric.
[Photo 6: tapestry needle weaving a yarn tail into the edge of the scarf]
Alt text: weaving in the yarn ends on a crochet scarf with a tapestry needle
Step 7: Add fringe (optional)
Cut 30 pieces of yarn, each 25 cm long. Fold one piece in half, push the folded loop through a stitch at the end of the scarf with your hook, and pull the tails through the loop. Tighten gently. Space the tufts evenly, about every second stitch, on both short ends. Trim to even them up.
Step 8: Block the scarf
Blocking is what takes a scarf from homemade to polished. Lay it flat on a towel, spray it lightly with water, and smooth it into shape. Leave it to dry for a day. Acrylic yarn should be steamed gently without touching the iron to the fabric, because heat can flatten it permanently.
[Photo 7: the finished scarf with fringe laid flat, then worn around a neck]
Alt text: finished easy crochet scarf with fringe, laid flat and worn
Tips and common problems
- The sides look wavy. You have probably added or skipped a stitch. Count at the end of each row until the habit sticks.
- The scarf is getting narrower. You are likely missing the last stitch of the row. Make sure your final hdc goes into the very last stitch.
- The scarf is getting wider. You may be working into the turning chain by mistake. Remember that it does not count as a stitch.
- Stitches feel too tight. Relax your grip on the yarn, or move up to a 9 mm hook.
- You ran out of yarn mid-row. Join a new ball at the end of a row. Leave a 15 cm tail and weave both ends into the fabric.
Easy ways to change the pattern
Once you are comfortable with the basic scarf, there are plenty of ways to make it your own:
- Stripes: change colour every four to six rows for a classic striped scarf. Switch on the last stitch of a row, then carry the yarn up the side.
- Width: start with a longer or shorter chain. Every 5 extra chains adds about 4 cm.
- Texture: work into the back loop only for a ribbed look, which also makes the scarf stretchier.
- Finish: add pom-poms, tassels or a row of single crochet around the border.
Frequently asked questions
How much yarn do I need for a crochet scarf?
About 250 g of chunky yarn is enough for an adult scarf 20 cm wide and 150 cm long. Buy an extra skein if you plan to add fringe.
What is the best stitch for a beginner scarf?
Half double crochet and double crochet are both good. Half double crochet gives a denser, warmer fabric, while double crochet works up faster and feels softer.
How long does it take to crochet a scarf?
Most beginners need around 8 to 12 hours, which is easy to spread over a weekend or a week of evenings. Experienced crocheters can finish in about 5 hours.
Can I use thinner yarn?
Yes. Use a smaller hook and a longer starting chain. A thinner yarn makes a lighter scarf, but takes more rows to reach the same length.
Final thoughts
A crochet scarf looks simple, but it teaches the habits that every crochet project depends on: even tension, accurate counting and tidy finishing. Make one, and you will be ready for hats, blankets and anything else you want to try.
If you try this pattern, I would love to hear how it went. Leave a comment with your yarn colours, or share a photo of your finished scarf. Happy hooking!