Free Crochet Rose Flower Pattern for Beginners – Easy 3D Rose Tutorial
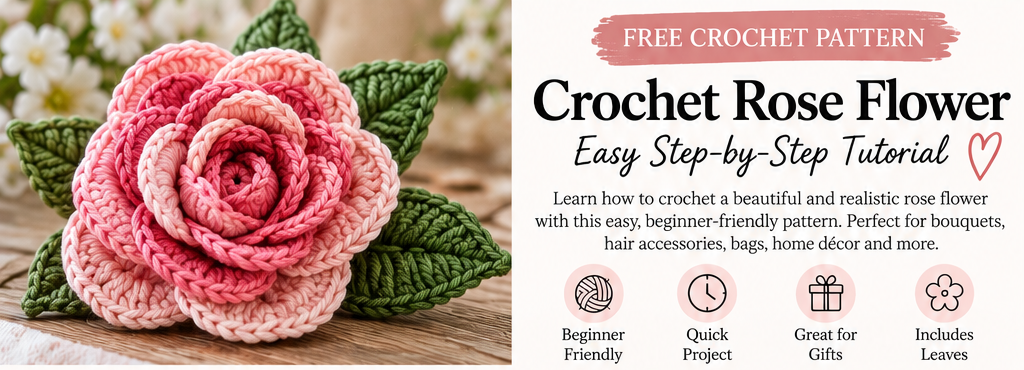
Would you love to make a beautiful crochet rose that looks like a real flower? This free crochet rose flower pattern will guide you through creating a handmade 3D rose with soft, layered petals and optional green leaves.
Crochet roses are wonderful projects for anyone who enjoys making flowers, decorative accessories, and handmade gifts. Unlike a simple flat crochet flower, a 3D crochet rose has overlapping petals that create a fuller, more realistic appearance.
You can use finished crochet roses to decorate handbags, hats, headbands, clothing, gift boxes, or even create a beautiful handmade flower bouquet.
This beginner-friendly tutorial covers the materials, basic stitches, detailed instructions, shaping, assembly, and creative ways to use your finished flowers.
For this design, we’ll crochet a strip of connected petals, then roll and sew it into a dimensional rose. This method makes it easier to control the flower’s shape without complicated increases or separate petal assembly.
Why You’ll Love This Crochet Rose Pattern
This pattern is a great choice if you want to create a decorative crochet flower that looks impressive without requiring advanced techniques.
- Beginner-friendly: Uses basic crochet stitches.
- Beautiful 3D effect: Curved petals create a layered rose.
- Customisable: Choose different yarn colours and flower sizes.
- Versatile: Use the rose for bouquets, accessories, and home decorations.
- Small project: Uses relatively little yarn.
- Optional leaves: Add green crochet leaves for a more natural appearance.
Once you understand how the petals are constructed, you can make several roses in different shades of pink, red, cream, or purple.
Crochet Rose Pattern Details
| Feature | Description |
|---|---|
| Pattern | 3D Crochet Rose Flower |
| Skill level | Confident beginner |
| Crochet terminology | US terms |
| Yarn | DK cotton or cotton blend |
| Hook size | 3.5 mm |
| Main stitches | Chain, single crochet, half-double crochet, double crochet |
| Construction | Crocheted petal strip, rolled and sewn |
| Optional extras | Green leaves and floral stem |
Finished size: Approximately 2.5–3.5 inches across is a reasonable starting target for DK yarn, but the actual finished size has not been physically measured or tested for this pattern.
Materials Needed to Crochet a Rose
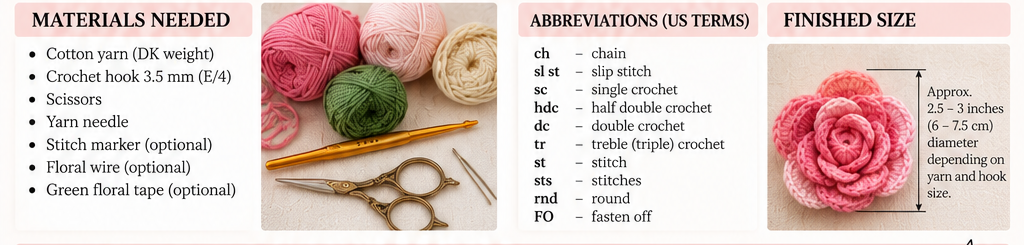
Before starting your crochet rose, gather the following supplies:
- DK-weight cotton yarn in pink, red, cream, or your favourite flower colour.
- Green yarn for optional leaves.
- A 3.5 mm crochet hook.
- A yarn needle.
- Scissors.
- Stitch markers, if needed.
- Floral wire or a craft stem, if making a bouquet.
- Green floral tape for covering stems.
Choosing the Best Yarn
Cotton yarn is a practical option for decorative crochet roses because it produces clearly defined stitches. Cotton blends can also work well.
For a soft, romantic rose, choose a light pink or cream yarn. For a bold flower, try dark red or burgundy.
Using thicker yarn generally produces a larger flower, while thinner yarn creates smaller, more delicate roses.
If you are a beginner, choose a smooth yarn that is easy to work with.
Crochet Abbreviations
| Abbreviation | Meaning |
|---|---|
| ch | Chain |
| sc | Single crochet |
| hdc | Half-double crochet |
| dc | Double crochet |
| sl st | Slip stitch |
| st | Stitch |
| sts | Stitches |
| FO | Fasten off |
The instructions below use US crochet terms. A US double crochet is equivalent to a UK treble crochet.
Step 1: Crochet the Rose Petal Foundation
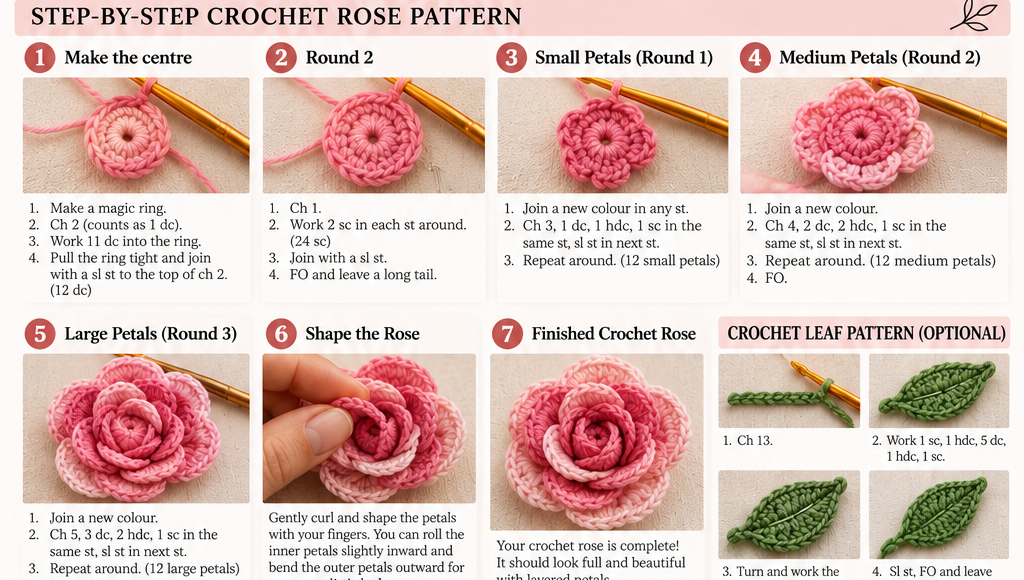
We’ll begin by creating a long foundation strip. This strip will become the base of your layered rose petals.
Foundation Chain
Using pink yarn and a 3.5 mm crochet hook, make a slip knot.
Chain 62.
Try to keep your chains evenly sized. If your foundation chain is too tight, the finished petal strip may curl unevenly.
Row 1: Make the Base
Work one single crochet into the second chain from your hook.
Continue working one single crochet into each remaining chain.
You should have 61 single crochet stitches.
Chain one and turn your work.
This creates the foundation for the petals.
Step 2: Crochet the Rose Petals
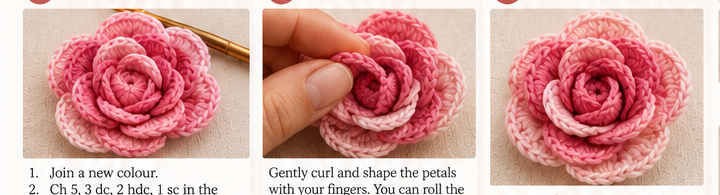
In this step, you’ll turn the flat foundation strip into a beautiful row of rounded petals.
We will use double crochet stitches to create the curved petal shapes.
Row 2: Create the Petal Shapes
Work one single crochet into the first stitch.
Now follow this sequence:
- Skip the next two stitches.
- Work five double crochet stitches into the following stitch.
- Skip the next two stitches.
- Work one single crochet into the next stitch.
This creates your first rounded petal.
Repeat the same sequence 10 times in total across the row.
You should end with 10 scalloped petals.
Each repeat uses six foundation stitches, and the initial single crochet uses one, accounting for all 61 stitches.
Fasten off, leaving a yarn tail approximately 18–24 inches long for sewing the rose together.
Your strip should now have a straight foundation edge and a scalloped upper edge.
Helpful Beginner Tip
If your petals are too tight, try loosening your tension slightly.
If the petals look too loose, check that each shell contains exactly five double crochet stitches.
Keeping the petal stitches consistent will give the finished rose a more balanced appearance.
Step 3: Shape Your Crochet Rose
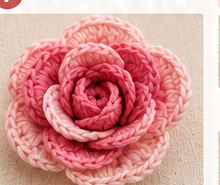
Now comes the most enjoyable part: turning your crocheted strip into a dimensional rose.
Place your crochet petal strip on a flat surface with the scalloped edge facing upward.
Begin rolling one short end inward to form the centre of the flower.
Keep the first few petals rolled fairly tightly. This creates the appearance of a rosebud.
As you continue rolling, gradually loosen the outer layers.
Allow the scalloped petals to overlap naturally.
The inner petals should appear closer together, while the outer petals can spread outward to create a fuller flower.
How to Make the Rose Look More Realistic
A natural-looking rose typically has a compact centre surrounded by larger-looking outer layers.
You can imitate this effect through careful shaping.
Gently fold or curve the outer petal edges away from the centre.
Avoid pulling too hard, as this may distort your crochet stitches.
Continue adjusting the layers until the rose has a rounded, balanced shape.
The exact appearance depends on the yarn and how tightly you roll the strip.
Step 4: Sew the Crochet Rose Together
Once you’re satisfied with the flower shape, it’s time to secure the layers.
Thread the long yarn tail through your yarn needle.
Hold the rolled flower firmly at its base.
Insert the needle through several layers near the bottom of the rose, making sure to catch the foundation edges.
Continue sewing back and forth through the base until the layers are securely attached.
Try to keep your sewing stitches hidden underneath the flower.
Once the rose feels stable, knot and weave in the remaining yarn tail.
Your basic crochet rose is complete!
You can now use it as a decorative embellishment or add leaves and a stem.
Step 5: Crochet Green Leaves (Optional)
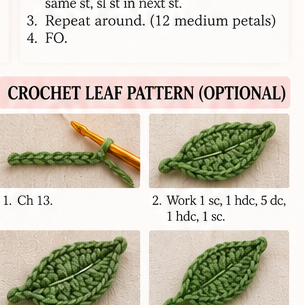
Green leaves can make your crochet rose look fuller and more natural.
This optional crochet leaf is made by working stitches along both sides of a foundation chain.
Foundation Chain
Using green yarn, chain 12.
First Side of the Leaf
Starting in the second chain from the hook:
- Work one single crochet.
- Work one half-double crochet into the next chain.
- Work one double crochet into each of the next six chains.
- Work one half-double crochet into the next chain.
- Work one single crochet into the next chain.
- Work three single crochet stitches into the last chain.
The three single crochet stitches at the end help you turn around the foundation chain.
Second Side of the Leaf
Continue working along the unused loops on the opposite side of the foundation chain.
Work one single crochet into the next chain, one half-double crochet into the next, six double crochet stitches across the next six chains, one half-double crochet, and one single crochet into the final chain.
Join with a slip stitch into the first single crochet.
Fasten off, leaving a yarn tail for sewing.
You now have an elongated green crochet leaf.
Attach the Leaves
Position one or two leaves behind the rose.
Use the green yarn tails to sew the leaves securely to the base.
For a fuller appearance, position the leaves at slightly different angles.
Step 6: Add a Stem to Your Crochet Rose
If you want to make a crochet rose bouquet, you can add decorative stems.
Choose suitable floral wire or a ready-made craft stem.
Position it underneath the base of your completed rose.
Secure the flower to the stem using an appropriate craft attachment method, then cover the attachment with green floral tape.
Wrap the floral tape around the stem to create a neat finish.
You can attach your crocheted leaves along the stem.
Important: Floral wire may have sharp ends. Cover and secure exposed wire carefully. Wire-stemmed flowers are decorative items and should not be used as toys for young children.
Beautiful Crochet Rose Colour Ideas
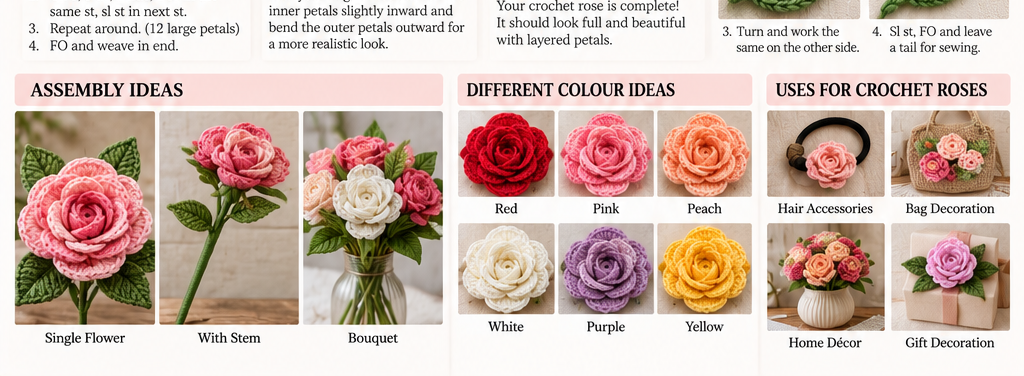
You don’t have to make every rose pink.
Experimenting with different yarn colours is one of the easiest ways to personalise this crochet pattern.
Red Crochet Rose
Red yarn creates a classic rose-inspired appearance.
This colour can be useful for Valentine’s Day crafts, handmade bouquets, and romantic decorations.
Pink Crochet Rose
Pink is a versatile choice for decorative flower projects.
Soft pink creates a delicate appearance, while darker pink gives a more vibrant result.
White Crochet Rose
White or cream yarn produces a simple, elegant-looking flower.
These shades can be combined with green leaves or other pastel flowers in decorative arrangements.
Purple Crochet Rose
Purple can create a colourful statement flower.
Try lavender for a softer appearance or deep purple for a bolder design.
Yellow Crochet Rose
Yellow roses are bright and cheerful.
They can be combined with peach, cream, and orange flowers for colourful spring or summer decorations.
Peach Crochet Rose
Peach yarn creates a warm pastel flower.
You can combine peach and pale pink roses to make a coordinated handmade bouquet.
Creative Ways to Use Crochet Roses
Crochet roses are useful for many craft projects because they can be attached to other items or displayed as standalone decorations.
1. Handmade Crochet Rose Bouquet
Create several crochet roses in different colours.
Attach them to covered craft stems and arrange them in a vase.
Add green leaves to create a fuller arrangement.
A handmade bouquet can be used as a table decoration or a thoughtful gift.
2. Crochet Rose Hair Accessories
Small crochet roses can be attached to fabric-covered hair accessories.
Choose lightweight yarn so the flower doesn’t become too heavy.
Use a secure attachment suitable for the accessory.
3. Crochet Rose Bag Decoration
Crochet bags and tote bags can be personalised with flower embellishments.
You can sew one large rose onto the front of a bag or arrange several smaller roses together.
Select colours that complement the bag material.
4. Crochet Rose Gift Decoration
Instead of using a conventional gift bow, attach a small handmade rose to the wrapping.
The recipient can keep the flower and reuse it for another decorative project.
5. Crochet Rose Home Décor
Place a collection of crochet roses in a small vase or arrange them on a decorative tray.
Crochet flowers can provide a long-lasting decorative alternative to fresh floral arrangements.
6. Crochet Rose Clothing Embellishment
Attach a small rose to a cardigan, scarf, or handmade top.
Keep the embellishment lightweight and sew it securely so that the fabric doesn’t stretch or sag.
How to Make Your Crochet Rose Bigger or Smaller
One benefit of this crochet rose pattern is that you can modify its size.
Make a Smaller Rose
Use finer yarn and an appropriately smaller crochet hook.
You can also reduce the number of scalloped petals by shortening the foundation chain in complete six-stitch repeats.
For example, a foundation chain of 38 will produce 37 single crochet stitches, allowing six shell-petal repeats after the initial single crochet.
Make a Larger Rose
Try thicker yarn and a suitable larger hook.
Alternatively, lengthen the petal strip in complete six-stitch repeats to create more overlapping petals.
For example, a foundation chain of 74 will produce 73 foundation stitches and allow twelve shell-petal repeats.
A longer strip can make the rose fuller, although it also requires additional yarn and sewing.
Common Crochet Rose Problems and Solutions
Why Does My Crochet Rose Look Flat?
The petal strip may be rolled too loosely.
Try creating a tighter centre and allowing the outer petals to spread outward gradually.
Secure the base once you’re happy with the shape.
Why Are My Petals Uneven?
Uneven petals can occur when stitches are accidentally added or missed.
Check that every shell contains five double crochet stitches.
Also make sure that you skip the correct number of foundation stitches between each shell.
Why Is My Flower Too Loose?
The yarn may be too loosely tensioned, or the rolled layers may not be sewn securely.
Try a smaller hook if your fabric itself is loose.
If the shape is the problem, add more secure sewing stitches through the base.
Why Is My Rose Too Small?
Yarn weight, hook size, and tension all affect the final dimensions.
A thicker yarn or additional petal repeats can produce a larger flower.
Why Are My Rose Petals Curling?
Some curling is normal because crochet shells naturally create curved edges.
If the petals curl excessively, examine your tension and the number of stitches in each shell.
You may also gently shape the flower by hand.
How to Care for Crochet Roses
Handmade crochet roses benefit from careful handling, especially when they are used as decorations.
Always check the yarn manufacturer’s care instructions.
For flowers without wire, glue, or other non-washable components, gentle washing may be possible if the yarn allows it.
Avoid twisting or pulling the petals.
Instead, gently press out excess moisture and leave the flower to dry flat.
Reshape the petals while the flower is drying if needed.
For bouquets containing floral wire or other craft materials, gentle dusting or spot cleaning may be more appropriate than washing the entire arrangement.
Store finished flowers away from rough objects that could catch the yarn.
Frequently Asked Questions About Crochet Roses
Is This Crochet Rose Pattern Suitable for Beginners?
Yes. The design uses common crochet stitches, including chain, single crochet, and double crochet.
Beginners may need some practice shaping and sewing the flower, but the stitch sequence is straightforward.
How Long Does It Take to Crochet a Rose?
The time required varies with your crochet experience, yarn, size, and sewing technique.
An experienced crocheter may finish a small rose relatively quickly, while a beginner should allow extra time for forming and attaching the layers.
What Yarn Is Best for Crochet Roses?
Smooth DK cotton or cotton-blend yarn is a practical starting choice.
However, different fibres can create different textures and levels of softness.
Can I Make Crochet Roses Without Stems?
Yes. Stems are entirely optional.
You can use the roses as appliqués, accessory decorations, or standalone embellishments.
Can I Make a Crochet Rose Bouquet?
Yes. Make several roses, add optional leaves, and attach them to suitable covered stems.
Arrange them in a vase to create a decorative bouquet.
Can I Make Two-Tone Crochet Roses?
Yes. You can experiment with different yarn colours, including variegated yarns or carefully planned colour changes.
Make sure that you secure the yarn tails before rolling the flower.
Can I Sell Finished Crochet Roses?
You can generally sell handmade flowers you make from this pattern, subject to applicable laws and any separate rights associated with embellishments or branding.
Use your own photographs when presenting finished products for sale.
What Should I Do if My Crochet Rose Doesn’t Match the Pictures?
The illustrations are AI-generated visual concepts and are not photographs of a physically tested version of this pattern.
Follow the written stitch counts and construction instructions, then adjust the rolling and shaping to obtain the desired appearance.
Final Thoughts
Making handmade crochet roses is an enjoyable way to practise your crochet skills while creating decorative flowers for gifts, accessories, and home projects.
This free crochet rose flower pattern introduces a simple method of working connected scalloped petals, rolling them into a flower, and securing the layers with a yarn needle.
Once you’ve made your first rose, try experimenting with different yarn colours, petal counts, and sizes.
You can also add green leaves, create decorative bouquets, or attach your finished flowers to handmade accessories.
With practice, you’ll develop your own techniques for shaping the petals and creating unique crochet roses.
Enjoy your crochet project and have fun exploring different floral designs!